Table of Contents
FAA Small UAS Registry
Read Requirements for commercial UAV use: https://www.faa.gov/uas/commercial_operators
Create an account to Register with the FAA:https://www.faa.gov/uas/commercial_operators
Aircraft
Assembly
Videos regarding assembly of the Ranger Pro can be found:
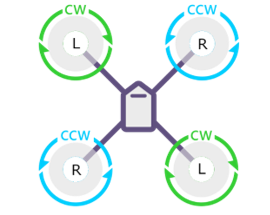
How should my propellers be attached to the drone?
The drone uses 2 pairs of counterclockwise (ccw) and clockwise (cw) propeller propellers. The cw propeller has a L marked on the propeller and the ccw propeller has a R marked on it so you can easily tell the difference in the cw and ccw propellers. The picture below shows how they should be positioned. If for any reason they are not positioned like this, the drone will take off and crash, causing damage to the propellers and possibly the motors or the entire drone.
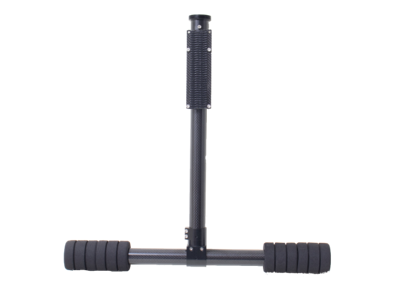
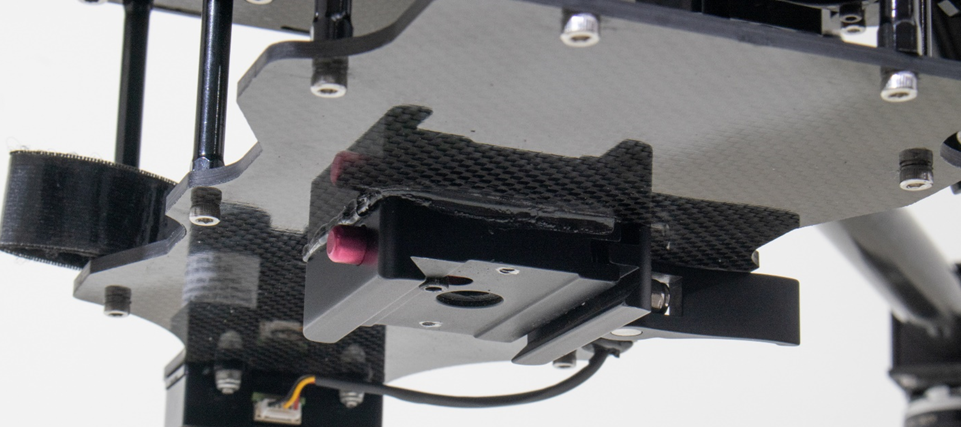
When attaching the landing gear, which way should the bracket for the antennas face?
The bracket on the landing gear should always face outwards when attaching the landing gear.
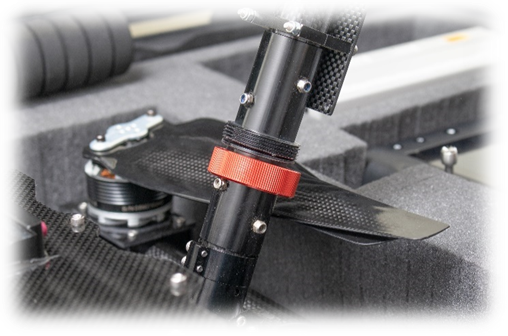
My leg bracket connectors are coming loose frequently, what should I do?
Check the O-Ring (inclusws) inside the bracket connector and make sure the O-Right is not stretched nor worn down or broken. The O-Ring is to ensure the connector stays tight and does not cause vibration. Please contact Wispr to replace if needed. Be sure to check the threads on the connector also for any worn places or breaks which would be causing the connector to not screw on tight and stay tight.
Operations
What should I do If my drone won’t arm?
Check the color of your blinking GPS LED lights. They should be blinking green, indicating you have GPS lock. You can also check GPS lock by selecting the satellite icon in Fly View to confirm you have GPS lock. You can not take off in loiter if you do not have GPS lock. If your GPS LED indicator light is not blinking green, you can check your smart controller on the megaphone icon for any error messages that may be preventing this.
The megaphone icon located in fly view in Wispr Ground Control (picture on the left) will switch to a red triangle icon with and exclamation point inside (picture on the right), letting you know there is a pre flight error that needs to be taken care of before arming and taking off.

Below are possible errors and why they occur
GPS Lock - If QGroundControl gives a GPS Glitch error, check to see if there are any structures (powerlines, Metal buildings, etc) that could be causing interference. This could cause no GPS lock. If so move the drone away from those structures, reboot, and now try to get GPS lock (Green Flashing Led Lights on top of the GPS).
Lack of satellites - On an overcast day, bad weather, structures causing interference, bad GPS and other situations can cause a low satellite count which in turn can cause no GPS lock. If your satellite count is too low QGroundControl will not allow it to arm. This is to prevent an unsteady flight. We recommend flying with no lower than 13 satellites. You can check then number of satellites you are picking up by clicking on the satellite icon in the fly tool bar and checking the GPS Count.
Battery Percentage too low for take off - If your battery percentage is too low, you will receive this pre flight error. You should either charge that battery or replace it with a freshly charged battery.
GPS High HDOP - This value is a measure of position accuracy. If above 2.0 and the vehicle is in a flight mode that requires GPS. This may be resolved by simply waiting a few minutes, moving to a location with a better view of the sky or checking for sources of GPS interference and moving the drone away from those sources of GPS interference.
Pre Arm ; Check Proximity Sensor Error - This error is coming from your obstacle avoidance and will not let the drone arm if it doesn’t detect and object within the range it is set to. To disable this, you may go to settings (red Q in the top left) and uncheck the “Enable proximity sensor” and the proximity sensor is now disabled. Be very aware of flying without the proximity sensor enabled as it now has no detection of obstacles in its' path.
What is RTK and when should I use it?
RTK is a navigation system that offers very precise accuracy of your drone. The RTK system is always in use on the drone’s GPS, but can be enhanced with a better signal by using a ground station that communicates with satellites and provides real-time location during the flight.
RTK should be used when you are in an area where your GPS is picking up a low amount of satellites or you have no GPS at all.
RTK can also be used with mapping as it will ensure your drone stays steady horizontally and vertically which is a key in getting accurate results and enhanced positional data down to centimeter resolution while mapping.
RTK is also used with the Air commander. The Air commander supports writing of GPS / RTK and Gimbal angles, information from your flight controller directly to the EXIF of photos in the camera SD card.
How do I set up my RTK system to work with the drone?
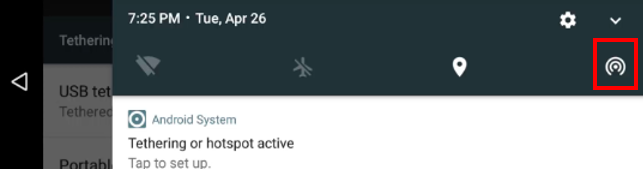
To connect your RTK system to your drone, you will need to first make sure you have the Portable WiFi hotspot enabled which you can find in the Wireless & Networks section. After that is turned on, swipe down from the top of the screen and select the icon on the far right to activate tethering.
Once you are in Wireless & networks choose Tethering and portable hotspot. Be sure the Portable Wi-Fi hotspot is turned on.
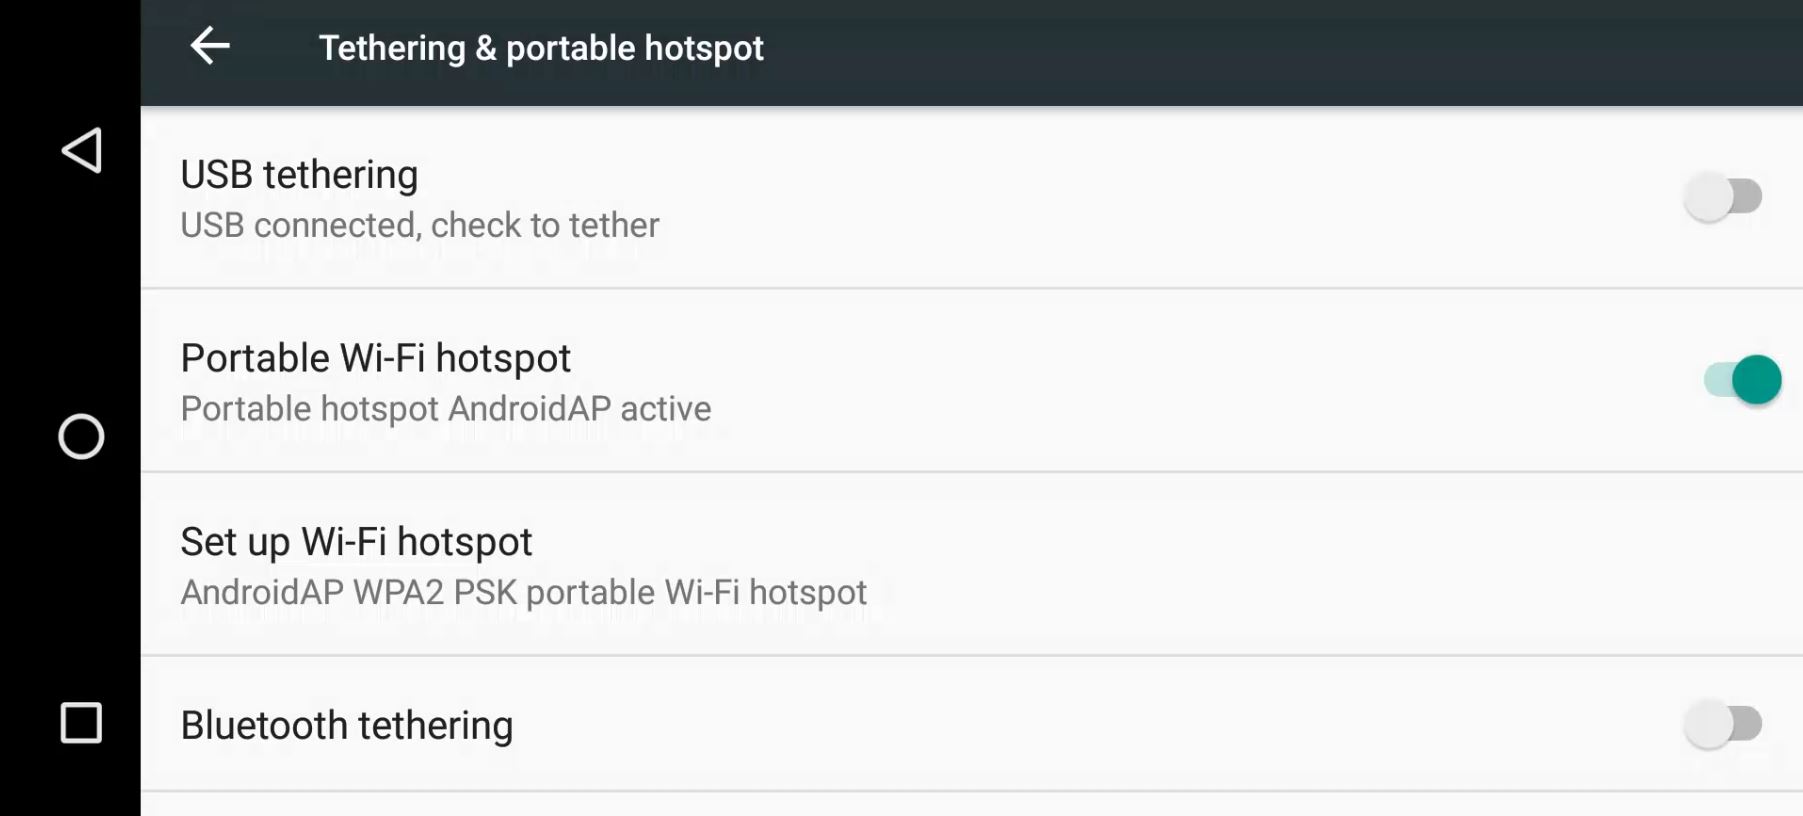
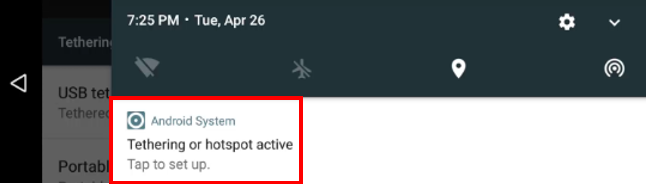
Click Tethering or hotspot active to get to Wireless & networks.
Select Tethering or hotspot active to get to Wireless & networks
Connect to the Wi-Fi hotspot on your tablet or computer via your Wi-Fi list.
Plug your RTK base into your device with WISPRGroundControl open on the tablet or computer. WISPRGroundControl will automatically detect the RTK base and share the RTK data from the tablet to your drone via the Wi-Fi tether.
For more information including a walkthrough video visit this link: RTK with WISPRGroundControl Quick Start Video
How do I connect my Here+ RTK to the WISPR Drone through QGroundControl?
Please read this manual for a walkthrough of connecting your Here+ RTK to your Drone through QGroundControl -
Using Here+ RTK With Wispr Ground Control
Can I fly in Altitude Hold mode?
Altitude Hold mode is only acceptable for emergencies. When flying in Altitude Hold, this mode does not hold position, it only holds altitude. If there is an emergency with GPS failure and the drone is needed to be in Altitude Hold, the barometer will be used to hold altitude. You should always fly in loiter!
What if I re-calibrate my compass and get a compass inconsistent error in WisprGroundControl?
You should not have to recalibrate your compass often if at all. If the compass is bumped or knocked off you would recalibrate the compass.
If you are getting a compass inconsistent error, this doesn’t always mean you need to calibrate. There could be low satellites due to clouds or it may just need to be moved to a spot away from any interference. If this does not work, try rebooting the drone and see if the error has gone away.
When calibrating make sure not to be near any metal buildings, concrete parking lot (rebar can throw the calibration off) under trees or any kind of overhead cover. If the calibration fails multiple times, move to a different area, preferably an area that is very wide open with nothing that could interfere with the calibration.
If calibrating via smart controller you can check how successful the calibration was by looking at the results (Green, Yellow and Red bars) on the screen once completed. Compass 1 (External Compass) should be in the green for it to be acceptable. If it is not in the green, recalibrate the compass until you get it in the green bar.
If calibrating via computer or tablet, you will first hook a long cord from your USB to the mini USB-C slot on the back of the drone. Next open QGroundControl or Mission Planner (either is fine) and connect to the program. You will then calibrate through there.
How much power is supplied on the front XT60 power output port?
24 Volts. Although it is unregulated 6S voltage which is 26.1-21 volts.
When should I get my drone tuned up?
Your drone should be tuned every 200 hours of flight time.
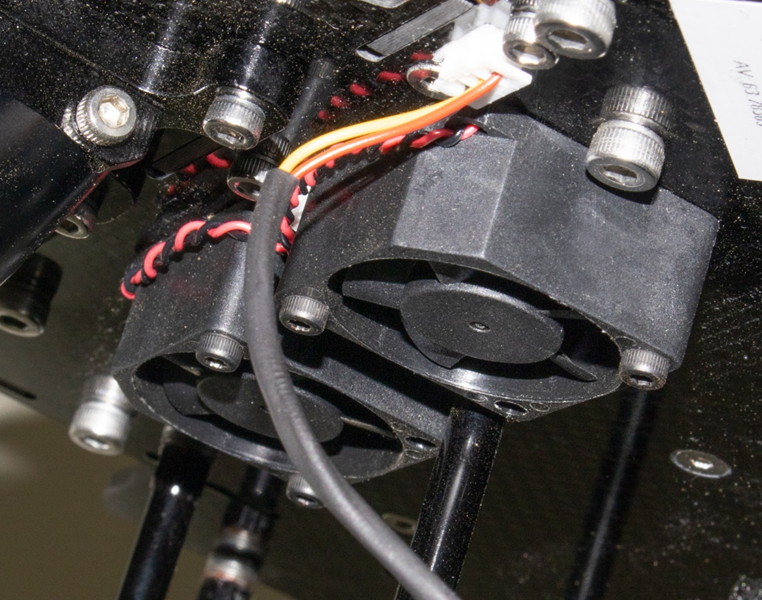
If one of the cooling fans under the bottom plate goes out is it ok to fly the drone?
No. If a fan goes out, you should contact customer support to have a fan sent to be replaced. The Drone needs all 4 fans to cool the inside of the drone. DO NOT fly if you are aware a fan is not working. This could lead to overheating and the drone malfunctioning.
What mode should be used to land the drone if not in loiter?
LAND mode should be used to land the drone. The land command ( C button on the smart controller unless changed by the end user) should be issued 6-10 ft from the ground. The user should always use the Land command to land the drone unless that is not an option. If this is the case, the drone may be brought down manually using the joysticks and landed, then unarmed by holding the left joystick down and to the left. This is for emergency cases only. If the land command is available or if the RTL (home button) is available, these should always be used before a manual landing as it is for very skilled pilots only.
Missions
This section is still under contruction as of 9/27/22. Please contact support if immediate help is required.
Planning a Photogrammetry Mission through WISPRGroundControl
Battery
How do I change my battery charger settings to LiHV to charge high voltage batteries and what is the process of charging the battery?
Hold the up and down arrows on the charger until the setting is changed to LiHV.
Plug in the battery XT90 connector to the male XT90 connector on the charger
Plug the balancer on the battery into the balancer on the battery
Change charging to 20A if not already set at this
Press and hold the start button until the charger beeps. You should get a warning on the screen about charging HV batteries.
press start one more time to begin charging.
You should now see the volts changing as the battery is now charging. If you would like to change a setting such as balance charge to fast charge, simply press the start button once to scroll through items that can be changed. To change them use the up and down arrows. Once you have the setting as you want it press start again to lock the changes in.
When inserting the battery into the battery tray on the drone, should I have the positive and negative wires on the right or left?
The positive and negative wires (red and black wires attached to the XT90 battery connector) should be on the right side when inserting into the battery tray.
The battery strap should be -
ran through the positive and negative wires
ran around the standoff (between the first standoff and the batteryt
ran back through the battery wires, pulled tight and velcro to secure the battery in the tray.
An example is below :
Battery instructional videos can be found:
What volts should my battery read to ensure it is completely charged?
26.11 volts to confirm it is fully charged. Once full charged, the battery charger will also blink finished on the charger LCD screen and cut itself off from charging, giving a beeping sound indicating the battery is fully charged.
Once the battery voltage hits 26.11 on the LCD battery screen, that does not mean it is fully charged. You should wait until the charger indicated the battery is finished to have a fully charged battery.
What is the different between fast charge, balance charge and storage charge on my charger?
Fast Charge - This mode tells the charger to only complete the first phase, constant current (CC) charging. The charger applies a high enough voltage to cause current to flow into the pack, up to the max current you've set. This gets the pack mostly charged, but the battery can still take more.
Balance Charge - For maximum health, you should always balance charge your batteries. This is also why your battery has a second plug on it. This second plug is called the balance plug and is used by your charger to individually monitor and balance charge each cell.
Storage Charge - This option should be used if you are not planning on using your battery for an extended period of time. You should never store a fully-charged LiHv battery. Instead, it should be brought down to “storage voltage”, which is 3.8 to 3.85 volts per cell.
If I plug my battery in and the charger beeps instantly with an error and will not begin charging what should I do?
Check that your balancer on your battery is plugged into the charger’s balance port correctly.
Check that your XT90 plug is fully plugged in.
Wires on both ports should be tight and not loose.
Check you have the correct mode set on the charger to charge the battery.
If all of these options look fine, use the battery cell option on your charger to make sure all cells are balanced. If you see a damaged cell, replace the battery immediately.
What setting should my charger be set on when charging my 25,000 mAh battery?
You should always charge Lithium High Voltage batteries on the LiHV setting on your battery charger. Failure to charge a High Voltage battery on the LiHV setting can cause damage to the battery and also cause a fire hazard.
Should I still fly if one of my batteries is damaged?
NEVER fly with a damaged battery. Even if it is minimal damage. This can cause your drone to fly unsafely and crash. Replace the battery and safely dispose of the damaged battery.
Smart Controller
I cannot install WGC using the install file. The script to install shows but stops and does not install WGC.
Enable "Developer Mode" on the DataLink by navigating to Settings -> About Phone -> Build Number and tap at least 7 times on "Build Number."
When the WGC script runs, I get an error message that says USB debugging is not allowing the script to run.
Go into settings and scroll down to developer options. Once in developer options, you will see USB debugging with a toggle switch to the right of it. Toggle the switch on. You may now run the script.
Your smart controller may ask you to allow USB debugging on this computer if it is the first time on that device. You may simply press yes to proceed.
What should you do if your smart controller is not staying charged for long enough?
We suggest buying an portable charger to extend the battery life throughout the day. Below are links to examples, but you can purchase any brand, size, price, etc. that will fit your needs.
Charmast Portable Charger, Smallest 10000 Quick Charge Battery Pack
40000mAh Power Bank, ROMOSS 18W PD USB C Fast Charging Portable Charger
What should you do if the LED light is flashing red/solid red on your Smart Controller?
This means the battery is critically low and the smart controller should be charged before any further use. Safely bring the drone back and ground it. Use of the controller while having a low battery could result in a dangerous flight and damage to the drone.
If the controller does go dead while in flight, a failsafe backup is on, which will bring the drone back to its launch position to avoid a fly away.
Be aware, a failsafe is on in case of disconnection or low power on the smart controller. The drone will RTL at the height the RTL_Height parameter is set at. Which means it could hit obstacles on the way back to its launch position. Always check your RTL_Height parameter and know what height it will RTL at to avoid hitting any obstacles.
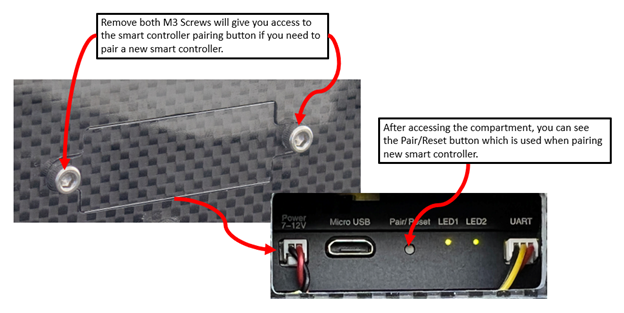
If the controller doesn’t load parameters when opening QGroundControl, what could be wrong?
First, check you have the correct smart controller that corresponds to that drone. If so, go into Settings under the settings icon. Check to see if the smart controller is paired under pair state. If not, you can remove the two silver bolts on the side of the drone to get to the air unit. Use a small tool to press and hold the pair/reset button until the LED light is flashing. Once flashing, you can pair to the smart controller by pressing the pair button under Radio in Herelink Settings. If this does not fix the issue please contact customer support for more help.
My smart controller will not connect to my 5 GHz network, what should I do?
If your smart controller isn’t allowing you to connect to a 5 GHz network, go to Herelink Setting and confirm that the country is set to US. If it is not, change to US and reboot the controller and try to connect.
If the controller is showing US and you still can not connect, Try: 1. Switching to a different country code. 2. Power the controller off and back on 3. Change the country code back to US and your SSID should show up.
Always check that the SSID you are trying to connect to is a 5 GHz band. If your WiFi is 2.4 band only it will not show up under the list of SSID’s in WiFi.
If the smart controller is dropped or any damage is noticed, what should I do?
If the smart controller is dropped, bumped or damaged in any way, the controller should be replaced. If you suspect any damage, DO NOT use the controller. This can cause your drone to crash. Also, always check your smart controller before each flight for any damage. DO NOT fly the drone if the smart controller is damaged in anyway. It must be replaced before you fly your drone.
What should my smart controller be charged to before flight.
We recommend you charge your smart controller to 100 percent before beginning any flight. This will help prevent mishaps mid flight and will also keep the flight safe, as a fully charged controller is always best.
If my drone is not flying smoothly, what should I do?
First, check that props, payloads, screws and landing gear are all secure. Next, recalibrate the compass through QGroundControl. If no errors are being thrown in QGroundControl after this and the flight hasn’t improved, contact customer support.
Telemetry data is not showing correctly or at all during flight.
QGroundControl should be closed completely then reopened before each flight. By not doing so this could cause telemetry data to be incorrect or not show any data at all which would cause an unsafe flight.
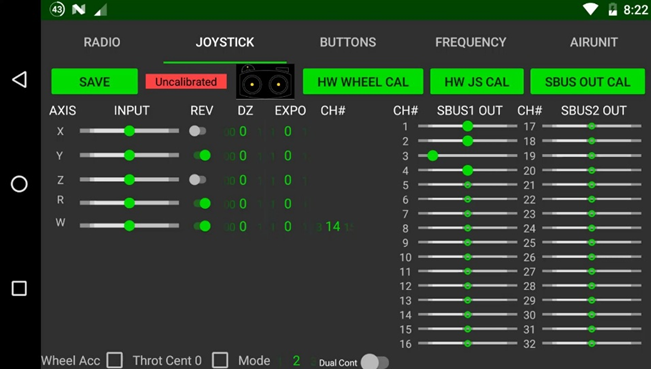
What should I do If I try to arm my drone with the joy stick and the “Calibration still running” error comes up, not allowing the drone to arm.
Open Herelink settings and check that the Y axis has been reversed under the joystick tab. If not reversed, the controller will try to put the drone into calibration mode instead of arming the drone when pulling the joystick down and to the right. See picture below:
What if my smart controller will not connect or show my WiFi SSID?
Your smart controller can only hook to 5 GHz bands. If your WiFi isnt 5Ghz, you can not connect to that SSID
Check in the settings that your smart controller is set to the correct country you are in. If it is not it will not show up on the SSID list when searching for available WiFi.
If your smart controller is set to the correct country in settings, try changing the country to any other country than the one you are located, rebooting the smart controller and then going into settings and changing the country back to the one you are located.
Missions
How do I plan a mission using WisprGroundControl?
How Low/ High should I run my a mission?
A missions should not be run below 164 feet. This is for the safety of you, anyone else there and the drone its self. The only exception is if you are running a bathymetry payload over open water. If not, you should be flying above 164 feet in a mission.
If I need to stop a mission while a mission is running and bring the drone back to the launch, do I have to start the mission over completely on the next launch?
No, the mission does not need to be restarted over. You may pause the mission and resume it by following the steps below. This allows you to stop the mission, land the drone, power it down and then repower and resume the mission where it was paused.
Select the pause button on the left toolbar to pause your mission (typically try to pause it at a waypoint in your mission)
Return the drone back to where you launched from and land the drone
Once landed an options screen will appear on the right side of the screen. You will see several options, one being “ Would you like to start the mission from the last waypoint?” Select that option.
The plan will be re-written once you select this, so do not power the drone off immediately.
You may now power your drone off do what you need to i.e. swap a battery
Close out of QGroundControl
Power the drone back on and open QGroundControl up again. Let parameters load as you normally would.
You may now resume you mission and it will start at the last waypoint you were at
Can you change mission speed while a mission is already in progress?
Yes. Mission speed can be changed but the mission should be paused using the left tool bar and pressing the pause button during the mission. Once the pause (Break) button has been selected you may go into General Settings and change the speed of the mission of m/s. If the mission is not paused, and the speed is changed, the speed of the mission will not change.
Payloads
General
My gimbal will not point to a specific pitch angle. What is the problem?
A wire is possibly loose or unplugged and you would need to contact customer support to check this over to see where the wire could be loose at.
What is the max wind speed to fly in and still have a steady payload?
With WISPR Drones, you can fly in 45MPH wind gust and your payload will stay steady and capture reliable data and photos.
What should I do if the lever on my dove tail mount for payloads feels loose?
This can be fixed by tightening the nut on the lever. If this can not be accomplished contact Wispr to have this replaced. Having a loose dove tail mount could lead to erratic flight, bad streaming from the payload or even loss of the payload.
Camera Payloads
An older picture is showing on the screen, what should I do to bring up the live stream?
Click the Auto Focus (AF) button, which will take the old pic off, focus the camera and bring the live stream up. You may also take a picture and the live stream will be brought up but the Auto Focus button should be tried first.
If the camera feed is not coming up, what should I do?
Check that the camera is powered on.
Take a picture using the camera trigger hardware button on the top right of your smart controller
Check your HDMI connectors and ribbon/cord to make sure there is no damage and they are connected properly.
Check to see if your HDMI connectors are loose in the ports. All connectors should be snug when plugging into your HDMI ports.
Leave the HDMI ribbon unplugged until the drone is booted up and then plug the HDMI back into the camera
If drone is already powered on, unplug the HDMI cable and plug it back in
Take a picture manually using the button on the camera itself
If all of these look good, you should close out of QGroundControl and reboot the drone. The camera feed should come up on the next boot.
After taking off and the camera shows it is going into geotagging mode and also shows it dumping the data once the flight is over but images aren’t being geotagged, What should I check?
Check that your SD card is inserted into the Air Commander completely.
Check that your SD card has the pictures on it
If the pictures are not on the SD card in the Air commander you should:
Try clearing and reformatting the Micro SD card
Check for any damage to the Micro SD card. If any damage can be seen, replace the Micro SD card.
Check your camera settings and be sure mass storage is selected.
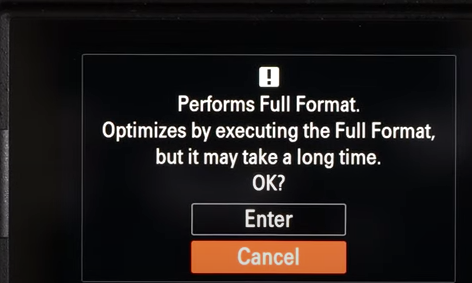
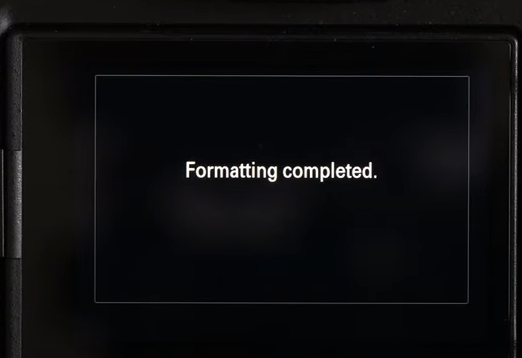
Reformat the SD Card through the Sony camera.
Reformat the MicroSD Card through the entire.
Sony A7r
What if the the feed shows the camera going in and out of mass data storage mode?
Unplug the multi port cable (top USB-C cable plugged in the side of the camera) while powering on the drone and once powered on and QGroundControl has loaded, plug the multi port cable back into the port.
Camera takes multiple pictures when sent a camera trigger command from the controller.
Inside of the menu settings-->Shoot Mode-->Drive Mode--> Change to single shooting.
The following message appears on the camera screen: “The Operation and Safetey of this Battery cannot be guaranteed”
When this message appears, it suggests the Dummy Battery in your camera is degrading. While this should have no effect on the operation of the camera, it does pop up an annoying window that must be closed out before use. Contact support for a replacement dummy battery.
Pictures are not being saved on the SD card in your A7r correctly.
Format the SD card through the camera settings. To do this, go to media in your camera menu. You will see the option to format. Turn the roll wheel and select enter by pressing the center button of the roll wheel to begin formatting. You will receive a message that the card has been successfully formatted when it is complete
WIRIS
What should I do if my Wiris camerea does not have camera control?
Fist check that your Wiris Camera is powered on.
Open WISPRGroundControl and select the General Setting button in the top left. Under payload be sure Wiris is selected as the payload
Check that your Air Commander is powered and a blue LED light is shining on the Air Commander
Press the take picture button on the WISPRGroundControl screen, and see if the Air Commander receives the command. To confirm this, you will se the blue LED light on the Air Commander blink white and then go back to blue after given the command.
Check that you see no cables are loose, cut or pulled out of their connectors going from the I/O ports to the gimbal, and from the bottom of the gimbal. ]
If you try all these steps and still do not have camera control, please contact customer support to get a replacement wire harness or have your payload shipped backed to be fixed.
Lidar
How to plan a Lidar Mission using WISPRGroundControl
How do I run a lidar mission using my AA450 on my Ranger Pro?
For more details visit our AA450 manual : AA450 LiDAR Quick Start and Best Practices Guide
How do I run a lidar mission using my Tridar Lidar on my Ranger Pro?
How do I set GPS antenna offset on lidar for Wispr Drones?
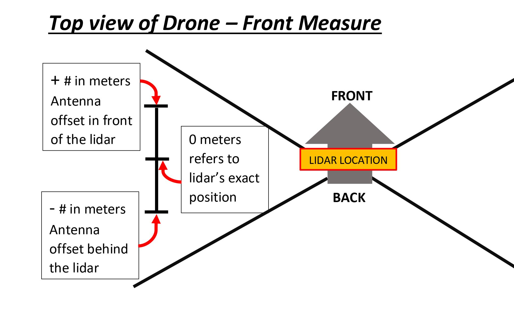
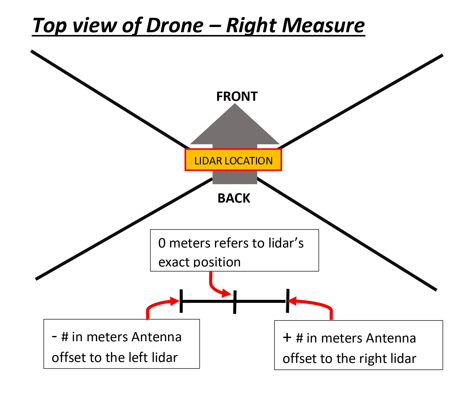
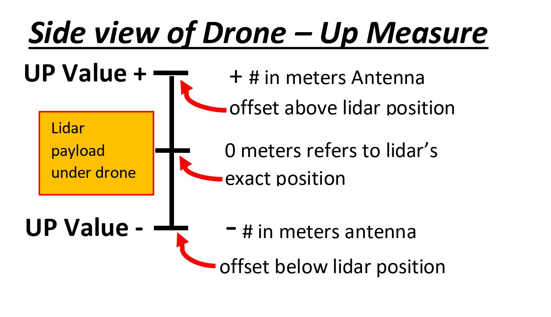
What should my Lidar offsets be set at?
AA450 lidar should be X-> 0, Y-> -0.104 and Z-> 0.432 If creating or uploading offset files
Tridar Hesia XT32 should be Right-> 0, Forward-> -0.104 and Up->0.457 If creating or uploading offset files
When surveying with lidar what coordinate datum should you use if using a PPK base?
When surveying with Lidar, WGS84 must be used on the PPK base. After you are done processing the lidar data it can be converted to NAD83 or any other state plane for review.
What speed will the drone RTL at after completing a lidar mission?
If Lidar payload is selected in WISPRGroundControl, once the mission is complete the drone will RTL at a set speed of 10m/s.
Can any Operating System be used when processing your lidar data?
Windows 11 should not be used. Windows 11 can throw off the time of your data as well as the data itself. Avoid using this when you process your data. Windows 10 is suggested.
Companion Computer
What if I cannot connect to the Prism but I am able to connect to the OS and Flight Controller?
Check to see If you have the DHCP fallback in settings, in the OS, changed to 192.168.3.9 and Antenna Scraping is selected. You must reboot after making these changes. Once this is done, you will be able to log into the Prism’s web page at 192.168.3.1.
How can I update my companion computer?
To update your companion computer, power up your drone and you will go to the Wispr Air OS at 172.16.1.1. Once there select the hamburger tab and then Wi-Fi and put in your Wi-Fi credentials and connect. You will receive a connected to “your wifi name” confirmation. After connected to Wi-Fi, select update under the hamburger tab and in the dialogue box select update again. It could take up to a few minutes for the update to complete. Once updated you will get a successfully updated message. Now you can reboot your drone. Your companion computer should be updated and this can be checked by going to 172.16.1.1 and checking that the version at the top has updated.
I cannot access my CPE’s webapp when connected to my Companion Computer. How can I fix this?
Due to the Companion Computer’s configuration, your CPE cannot have a static address of 192.168.4.x.
Ensure that you have set the Companion Computer’s mode to “Antenna Scraping” and have set the Companion Computer’s Static LAN Address to be on the same network as your CPE. For example, if your CPE has a static LAN address of 192.168.1.20, you should set the Companion Computer’s static LAN address to 192.168.1.21. To access these settings, connect to the Companion Computer, browse to 172.16.1.1, click “System Manager” in the top left corner, and select “Settings”.
I have the prism hooked up to my companion computer and the USB connected to the companion computer is not collecting data while I run a survey. What is wrong?
Your prism must be plugged into the companion computer before powering on the drone to collect data correctly.
.Check that the Flight controller is connected.
You can do this by entering into the WISPR OS at 172.16.1.1. If the FC is connected, you will see a FC with two arrows in the top left of the screen and it will be blinking Green. This means you are connected to the flight controller using telemetry.
Check your USB format. If you have a USB it needs to be formatted into the FAT 32 format.
If your USB is lager than 32GB you will need to use a program (if you are using a windows computer) to format your USB to FAT 32. Windows only allows up to 32GB and smaller to format to FAT32 We suggest using this program and following the steps to format your USB to FAT 32 if you are using a Sandisk USB (We send all of our companion computers with Sandisk USBs)
If you are using another brand other than Sandisk, there are other programs available online that will allow you to format them.
Check that you are able to access 192.168.3.1. This is the Prism home page which allows you to configure the prism. If you can’t connect to this you will not gather data. See below possible issues
Go to the WISPR OS (172.16.1.1) under Settings, and check the fallback DHCP is set to 192.168.3.9. If not change to that IP and reboot the drone for that to take affect.
Check the cord for any damage. If plugged in correctly the STAT button should be blinking green letting you know you are getting correct power.
Check that your Prism IP default is 192.168.3.1. You can check this by plugging the prism straight into your computer and going to that address. If set correctly the Prism home page should be available.
Wispr Ground Control
The Wispr Ground Control Update Tool crashes when I try to run it and will not install the app. How can I fix this?
Confirm you followed all steps correctly in the manual: Updating Wispr Ground Control .
Check that you are installing from the extracted file and not the zipped folder
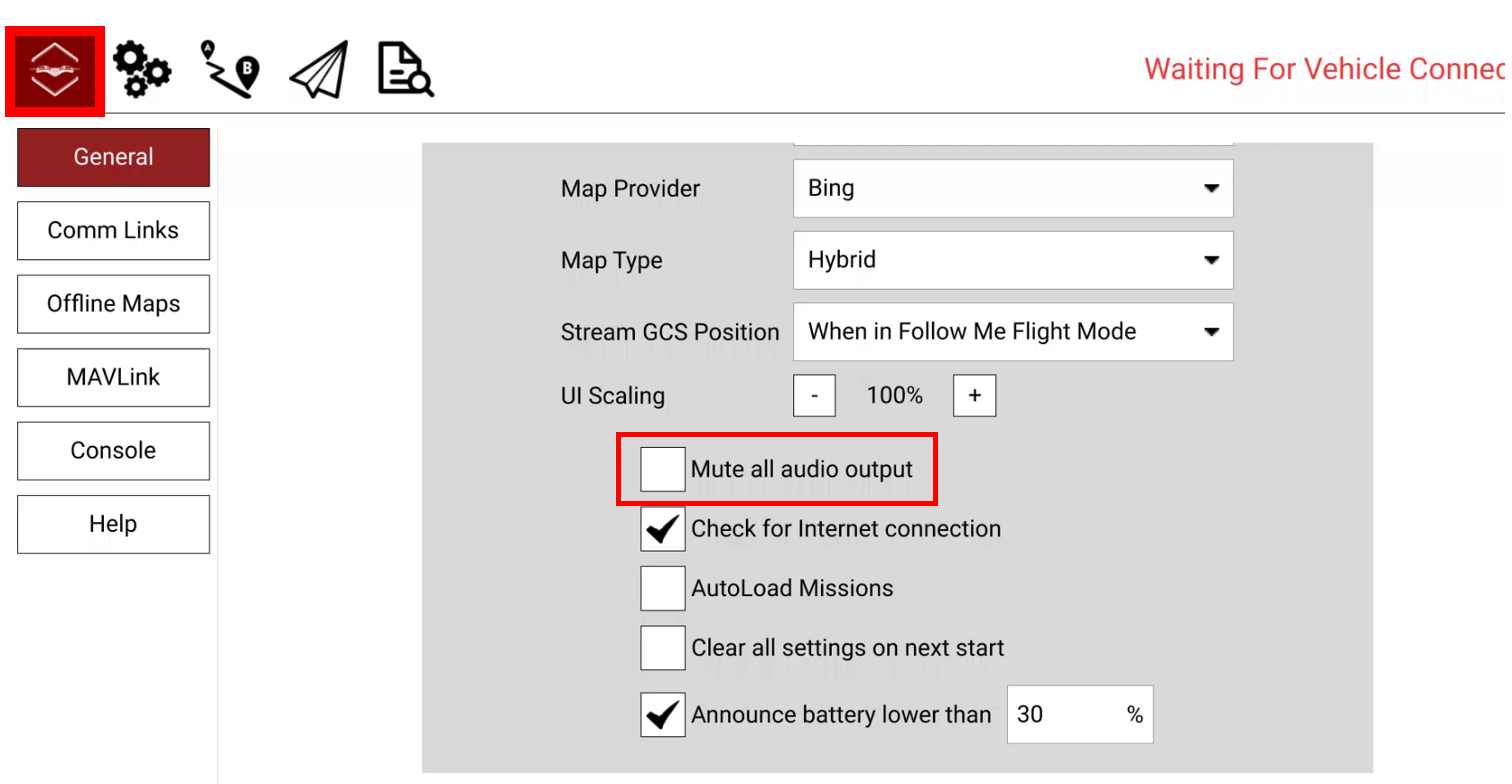
Can the volume be adjusted while inside of WisprGroundControl?
Yes. You can mute all audio output if needed by navigating to the settings button on the toolbar, going to general, scroll down and select the “Mute all audio output” option as seen below. To unmute the volume, simply untick the option box.
What should I do If I try to upload a new version of WGC Flight Firmware through Mission Planner and it says “Can Not Read Board”? How can this be fixed?
If you try to load the Custom Flight Firmware onto the drone and everything is hooked up correctly. and you get the error message of “cannot read board”, you should check in the top right and make sure the COM port is set to Auto. If it is set to anything else you will not be able to load the Custom Flight Firmware and will get an error message. Change to Auto on the COM port and follow the steps.
How do I use the Offline Maps feature and what is it good for?
Offline maps are good to create if you are going to be flying at a later time in a spot without WiFi access but still need the maps while flying. Here is a guide on how to use them and how to put them on your smart controller : Downloading Maps While Offline