Table of Contents
Customer Support
How do I contact Customer Support if I cannot find the answer to my problem here?
Customer support can be contacted via this page: https://wisprsystems.atlassian.net/servicedesk/customer/portal/3/group/11/create/38.
You may also contact support via email at support@wisprsystems.com.
FAA Small UAS Registry
Customers will be required to register their drone with the FAA in order to legally fly. Listed below are some helpful links to get this process underway.
Read Requirements for commercial UAV use:
https://www.faa.gov/uas/commercial_operatorsCreate an account to Register with the FAA:
https://faadronezone-access.faa.gov/#/Here you can read the Wispr Quick Start Guide for more information regarding registering your drone through the FAA website: Registering Your Drone Through the FAA
Assembly
Videos regarding assembly of the Ranger Pro can be found here: https://wisprsystems.atlassian.net/wiki/spaces/CS/pages/53084161/First+Flight+Quickstart+for+Ranger+Pro#Unboxing-and-Assembling-the-Ranger-Pro
Ranger Pro Unboxing and Assembly
Open the Wispr Ranger Pro carrying case to reveal the drone.
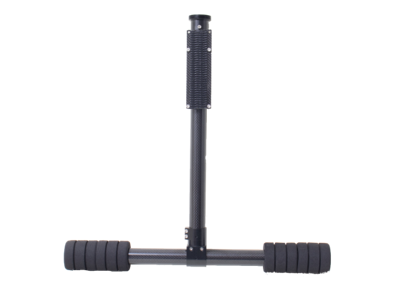
Attach the landing gear by inserting the two metal pins on the leg into the two holes present in the leg connector, and then screwing the connector ring on tightly. The antenna mounts (velcro pads) should be facing toward the outside of the leg.
Attach both of the antennas to the antenna mounts on the outside of the landing gear.
Remove the drone from the carrying case.
Unclip the arm holders and remove the straps securing the propellers.
Unfold arms and lock them into place using the latches attached to the drone arms.
When attaching the landing gear, which way should the bracket for the antennas face?
The bracket on the landing gear should always face outwards when attaching the landing gear.
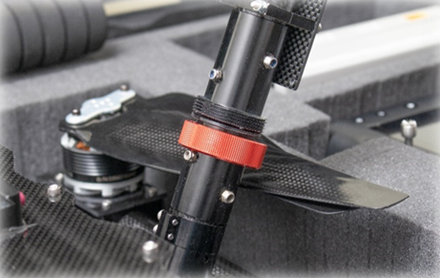
My leg bracket connectors are becoming loose frequently. What should I do?
Verify the O-Ring (included) is inside the leg connector (the red metallic ring) Ensure the O-Ring is not stretched, worn down, or broken. The O-Ring is to ensure the connector stays tight and does not cause vibration.
Check the threads on the leg connector for any worn areas or breaks which may be preventing the connector from screwing on tightly, or remaining tight during flight.
If O-Ring needs replacing or leg connector is damaged in any way please file a ticket through this form: https://wisprsystems.atlassian.net/servicedesk/customer/portal/3/group/11/create/38
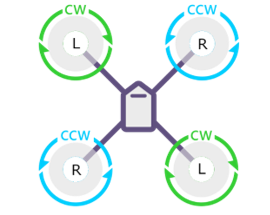
How should my propellers be attached to the drone?
The drone uses 2 pairs of counterclockwise (CCW) and clockwise (CW) propellers. The CW propeller has a ‘L' marked on it, and the CCW propeller has a 'R’ marked on it. You can easily tell the difference in the CW and CCW propellers by these markings. The picture below shows how the propellers should be positioned. If for any reason they are not positioned in this manner the drone will attempt to take off and ultimately crash, potentially causing damage to the propellers, motors, GPS or the body of the drone.
When should I check the condition of my propellers?
Propellers should be checked before each flight. You should check for cracks, breaks or any looseness in the propeller on the motor. If any of these are present DO NOT launch the drone. Even a small chip or crack in a propeller can cause an unsafe flight. Replace the propellers immediately.
Battery Information
The high voltage batteries used in the Ranger Pro should be charged on LiHV rather than LiPo. LiPo is the default setting on the SKYRC dual battery charger that is packaged with Wispr drones. In the event of a power outage in a location where your charger was plugged in, be sure to change your charger back to LiHV- as the charger will reset to LiPo when disconnected from power.
How do I set my battery charger to LiHV for charging high voltage batteries, and what is the process of charging the battery?
Hold the up and down arrows on the charger until the charge setting is changed to LiHV.
Plug the battery’s XT90 connector into the XT90 port on the charger.
Plug the balance port on the battery into the balance port connected to the battery charger.
Change charging to 20A, if the charger is not already set to this value.
Press and hold the start button until the charger beeps. You should see a warning on the screen about charging high voltage batteries.
Press start one more time to begin charging.
You should see the volts increasing, as the battery is now charging. If you would like to change a setting such as balanced charge to fast charge, simply press the start button once. The selected option will blink, and can be changed using the up or down arrows. Each press of the start button will select the next item on the screen that can be changed. Once you have the settings configured the way you would like, press start again to lock the changes in.
To see an example of how to charge your batteries correctly, and how to configure your charger settings properly, please watch the video below.
Charging Your Batteries with the Ranger Pro
Charging a LiHV battery on LiPo setting will likely not cause a fire but will not allow a full charge, and can damage the battery. Charging a LiPo battery on LiHV settings can cause a fire. Please be aware of this.
What volts should my battery read to ensure it is completely charged?
26.11 volts to confirm it is fully charged. Once the battery voltage hits 26.11 on the LCD screen of the charger, that does not mean it is fully charged. You should wait until the charger sounds to indicate the battery is finished and the LCD screen reads “END: FINISH” to have a fully charged battery.
What is the different between fast charge, balanced charge and storage charge settings on my charger?
Fast Charge - This mode directs the charger to only complete the first charging phase, constant current (CC) charging. The charger applies a high enough voltage to cause current to flow into the battery, up to the max current you've set. This will mostly charge the battery, but there will still be some unused capacity with this mode.
Balanced Charge - For maximum health, you should always balance charge your batteries. This is also why your battery has a second plug. This second plug is called the “balance plug” and is used by your charger to individually monitor and balance charge each cell.
Storage Charge - This option should be used if you are not planning on using your battery for an extended period of time. You should never store a fully-charged LiHV battery. Instead, it should be set to the storage charge setting, and the voltage decreased to “storage voltage”, which is 3.8 to 3.85 volts per cell.
If I plug my battery in and the charger instantly beeps with an error preventing charging , what should I do?
Check that the balancer plug (white plastic plug on the battery) and the XT90 plug are properly plugged in. Wires on both ports (balancer and XT90) should be plugged in tightly.
Verify that you have the correct charging mode set on the charger.
If these options are not the issue, use the charger to make sure all cells are balanced. You can check the cells by pressing the stop button once, the start button once, and then the up arrow once. If you see a damaged cell, replace the battery immediately.
Can I still fly using a damaged battery?
NEVER fly with a damaged battery, even if it is minimal damage. This can cause your drone to fly in an unsafe fashion, and crash. Replace the battery and safely dispose of the damaged battery.
When inserting the battery into the battery tray on the drone, should I have the positive and negative wires facing to the right, or facing to the left?
The positive and negative wires (red and black wires attached to the XT90 battery connector) should be on the right side when inserting into the battery tray.
Additionally, the battery strap should be:
Looped around the left standoff of the entrance to the battery tray. The velcro side should be facing outwards.
Pulled from left to the right, threaded between the positive and negative wires.
Around the right side of the battery, in between the battery and the standoff.
Run back through the battery wires, pulled tight, and pressed firmly against the soft side of the velcro to secure the battery in the tray.
Wedge the remaining connector in between the battery and the strap.
Ensure that the loop around the left standoff is positioned to rest in the center of the standoff, so that the strap stays in place for the duration of the flight. The strap should go evenly across and be firmly pressed against the battery.
For a video demonstration of this process, please watch the video below:
Battery Insertion Walkthrough for the Ranger Pro
Further Battery instructional videos can be found here:
Smart Controller
What should you do if your smart controller is not staying charged for long enough in the field?
We suggest buying a portable charger to extend the battery life throughout the day. Below are links to recommendations, but you can purchase any charger that will fit your needs.
Charmas Portable Charger, Smallest 10000mAh Quick Charge Battery Pack
40000mAh Power Bank, ROMOSS 18W PD USB C Fast Charging Portable Charger
What should you do if the LED light on the smart controller is solid/flashing red?
This indicates the battery is critically low and the smart controller should be charged before any further use. If you are flying and you see this, you should return to launch immediately. Use of the controller while having a low battery could potentially result in a dangerous flight situation or end with damage to the drone.
If the controller runs completely out of battery during a flight, a failsafe is active that returns the drone to its launch position to prevent a fly away.
Although failsafe exists in case of a disconnection or a depleted battery on the smart controller, the user should not willingly fly with a low battery controller. If this does occur, the GSC failsafe will kick in and the drone will RTL at the height you have set in WisprGroundControl General Settings. Be sure you have that an appropriate height is set before launch, and be aware of obstacles that may be in the path when an RTL sequence takes place.
My smart controller will not connect to my 5GHz network. What should I do?
Always confirm that the SSID you are trying to connect to is a 5GHz band. If your Wi-Fi is a 2.4 GHz band it will not show up under the list of SSID’s in the Wi-Fi menu.
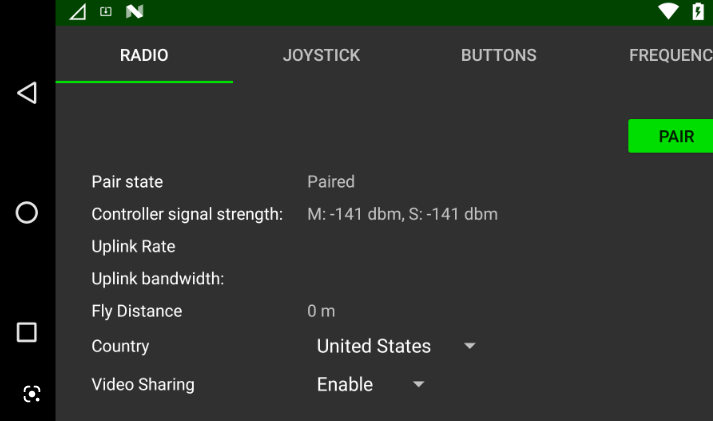
If the smart controller isn’t allowing you to connect to a 5GHz network, go to your apps menu and tap Herelink Settings. Under the Radio tab, confirm that the country is set to United States. If it is not, change it to United States, reboot the controller, and try to reconnect. Available 5GHz networks should now allow you to connect the smart controller to your choice of network.
If the controller displays United States and you still cannot connect, try:
Switching to a different country code. (You may pick any)
Power the controller off and back on.
Change the country back to United States, and your 5GHz SSID should now be visible for connection.
If the controller doesn’t load parameters when opening WisprGroundControl, what could be wrong?
Navigate to Herelink Settings and under Radio, make sure the Pair State reads “Paired”. If not, you can use these steps to pair your smart controller to your drone. The question above contains an image of this screen if you wish to view for visual reference.
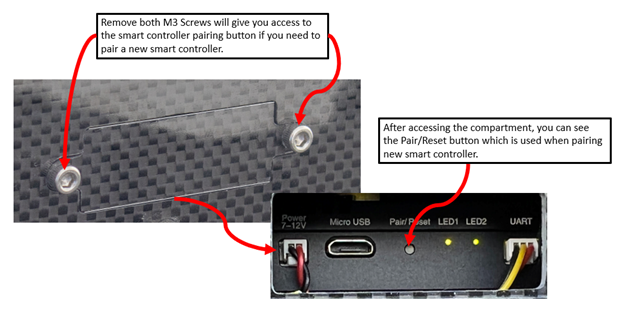
Remove the two screws attached to the access door on the left side of the drone to gain access to the Pair/Reset button.
From the same screen where the paired status is checked, locate the Pair button beneath the Frequency tab.
Use a tool with a small, pointed tip to press and hold the Pair/Reset button until LED 2 is flashing green.
Once flashing, press the Pair button. LED should turn solid green and the pair state should now read “Paired”.
If the smart controller has sustained damage, what should I do?
If the smart controller has been damaged in any way, the controller should be replaced. If you suspect any damage, DO NOT use the controller. This can cause your drone to crash. Always check your smart controller before each flight for any damage. It must be replaced before you fly your drone.
How much battery should the controller have before flight?
We recommend you charge your smart controller to 100% before beginning any flight. This will help prevent mishaps in flight and is the best course of action with safety in mind.
Telemetry data is not displaying properly, or at all during flight.
If this occurs during flight, land the drone and move to the next step.
Close WisprGroundControl and reopen the application. This should reset the app, and all data should be properly displayed upon when you reopen.
Reboot the drone if closing the application does not work.
After trying to arm the drone with the joysticks, an error reading “Compass calibration running” appears, preventing the drone from arming. What do I do?
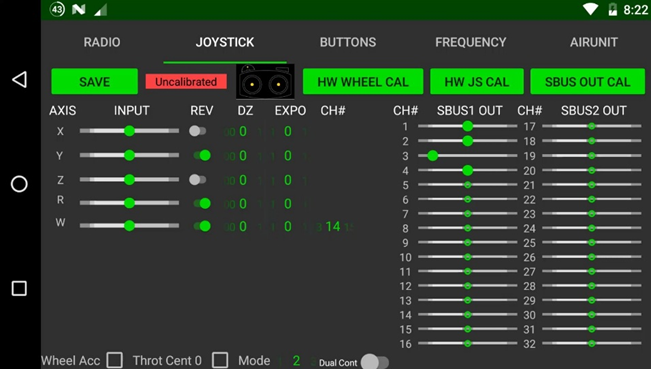
Open the Herelink Settings, select the Joystick tab, and make sure that the Y axis has been reversed. If it is not reversed, the controller will try to put the drone into calibration mode instead of arming the drone when pulling the joystick down and to the right. See picture below:
WisprGroundControl
I cannot update WGC. When I run the update tool, the script to install appears, stops, and does not install WGC.
Confirm you followed all steps correctly in the manual: Updating Wispr Ground Control
Ensure that you are installing from the extracted file and not the zipped folder.
To extract the files from the zipped folder, right click and select “Extract All”
Enable "Developer Mode" on the smart controller by navigating to Settings → About Phone → Build Number and tap at least 7 times on Build Number. You will receive a message stating “You are now a developer”. Once you finish this step you need to enable USB debugging in the settings.
Go into settings and scroll down to Developer Options. Once there, you will see USB debugging with a toggle switch to the right of it. Toggle the switch on. You may now run the update tool again.
The smart controller may prompt the user with a message reading “Allow USB debugging on this computer?” if it is the first time updating from that computer. Press yes to proceed. You will only need to allow USB debugging one time on each device.
Pre-Arm Errors and Fixes
Over time, users may encounter pre-arm errors that will prevent takeoff. Usually the user will take note of pre-arm errors in the bottom center of the screen, displayed with a yellow dialog box. The user can also view a log of errors via the megaphone icon on the icon bar at the top of the screen. The icon has two states: no alerts and unread alerts. No alerts will be displayed as a megaphone icon, and unread alerts will display as a triangular warning icon.

Below a list of pre-arm errors that the user may encounter during general operations has been compiled, along with actions the user can take to resolve them.
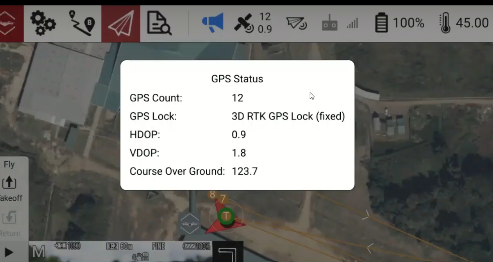
No GPS Lock - Check the number of satellites you’re receiving, which can be done by viewing the number next to the satellite icon on the icon bar at the top of WisprGroundControl. If there are less than 13, reboot the drone. If that doesn’t clear the error, try moving the drone to a different location- ideally wherever offers the maximum clearance between the GPS and the sky. Obstructions can have a significant impact on satellite detection. You will know you have achieved GPS lock when the LED lights on the sides of the GPS are blinking green and continue to do so.
GPS High HDOP - This triggers based off of a function that measures position accuracy, and can appear in flight modes where GPS is necessary. Allow a small amount of time to elapse in order for the GPS to settle, as sometimes this error can clear itself without need for action. If the error persists, try either rebooting the drone, or moving the drone to different location especially away from metal objects. Even rebar directly underneath concrete the drone is resting on could potentially trigger this.
GPS Glitch - This occurs when the GPS is not reading the correct coordinates for more than 5 seconds. This usually will resolve itself by waiting for the number of satellites to increase. If it doesn’t clear on its own, move the drone to a different location, paying heed to metal nearby. A reboot can potentially solve this as well if you seem to be unable to find ideal positioning. If the error persists, the GPS needs to be inspected- and likely recalibrated.
Need 3D Fix - This error occurs when the drone is in a mode where it requires a GPS signal to take off, but the GPS signal isn’t strong enough. It is handled in much the same way as the GPS Glitch and High HDOP errors, as they are all GPS centric. This can almost always be solved by moving the drone a few feet over from its current position. A common cause of this is the presence of metal in the ground beneath where the drone rests. If that does not fix it, a simple reboot should fix it. If neither of these work, it may be time to look at the GPS for hardware issues.
Battery Below Arming Voltage - You will receive this error if the drone detects the voltage output of the currently equipped battery is too low. This occurs to prevent beginning a flight with a battery that may deplete too quickly and result in a crash. Charge the battery completely before flying, or swap to a fresh battery.
Pre-Arm: Waiting for Terrain Data -
Check that you have the terrain data tiles downloaded for the area you are flying.
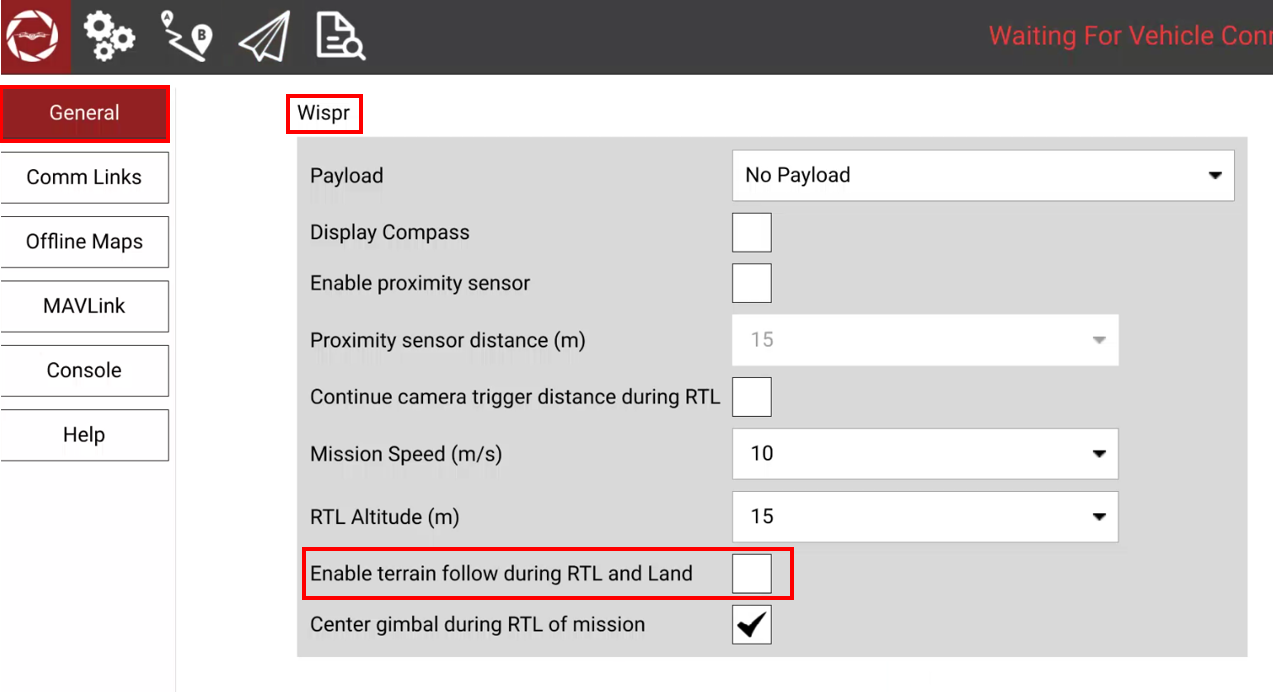
When downloading maps, be sure to have the “terrain data” option checked to ensure that terrain data is download alongside the map you download. If the download of the terrain data is unsuccessful, or if you have terrain data but are still encountering this error and subsequently are unable to take off, then you may disable the “Enable terrain follow during RTL and Land” in Wispr General Settings. Simply uncheck this box to fix the pre-arm warning. Keep in mind this will not use terrain data when you RTL or while landing.
For a guide with information relevant to this error, check out this link:
Downloading Maps While Offline and Setting Terrain Follow
Pre-Arm: Check Proximity Sensor - There may be an object too close to the sensor, or the sensor may be malfunctioning. Generally the best practice is moving the drone to a spot where it is less likely to pick up anything that will cause the pre-arm, but sometimes this issue won’t resolve itself until a reboot occurs. Occasionally, allowing some time to elapse will let the sensor recognize a falsely detected obstruction, and it will clear the error. Try these approaches multiple times. If the sensor continues displaying the error, the option to disable it exists in the general tab of the WisprGroundControl settings. You can find this by tapping the Wispr logo in the top left corner of WisprGroundControl.
If you opt to do this, please exercise extreme caution when flying. With this setting disabled, the drone has no collision avoidance active and nothing will prevent the drone from flying directly into an obstacle or bystander.
Compasses Inconsistent - This is caused from reading the Internal and External compasses as pointing in different directions. Reboot the drone. If the same pre-arm error continually appears, a compass calibration should fix this.
Pre-Arm: ESC Temp Over Threshold. False Reading Detected - This error occurs when temperatures are very cold. The values for the ESC temps range from 0-255 degrees Celsius. When the value is read as below 0 from the cold, it will cause a false reading that registers the ESC temps as maximum. This error appearing just confirms the drone has detected the false reading. Do not be alarmed by this error, as it will not alter the drone’s behavior and should have no impact on pending operations. If you see this, you may safely close the message box and continue.
Low Battery Failsafe RTL - This means the drones has calculated how far it is from home and how much battery it will take to get back to home safely. This sequence should never be cancelled unless in an emergency, in which case the drone should be landed immediately.
Updating WisprGroundControl and Wispr Flight Firmware
Periodically Wispr will release software and firmware updates that the customer will need to know how to receive so that their drone is always flying with the latest and greatest we have to offer. Software would apply to WisprGroundControl, and updates for it will only effect settings and elements within the app. Flight firmware updates are less frequent, yet very important updates that can effect flight characteristics.
Take a look at these two guides to get you started, or as a reference in case you forget something:
Updating Wispr Ground Control
Updating Wispr Flight Firmware
While trying to update Wispr Flight Firmware in Mission Planner, a pop-up reading “Is this a Solo” appears. What should I do?
Do not be alarmed by this message. Select “No” and the custom firmware will begin to load.
Missions
At what altitude should missions be conducted?
Missions should not be conducted below 164 feet. This is for the safety of you, anyone else present, and the drone itself. The only exception is if you are running a bathymetry payload over open water. If not, you should be flying at or above 164 feet in any missions you conduct.
Can you change mission speed while a mission is already in progress?
Yes. Mission speed can be adjusted, but the mission should be paused as it will not change otherwise. Once you pause the mission, you may enter the general settings tab by tapping the Wispr logo in the top left, and change the speed of the mission using the dropdown.
Can KML files, such as a mission you already have planned, be uploaded to WGC?
Yes! You can upload KML files onto WisprGroundControl in a couple of ways.
You can copy the KML file from the SD card inserted into the SD card slot on the smart controller into the WGC/Missions folder found on the smart controller. You may do this by using the Android OS file manager on the smart controller.
You may also connect the smart controller to your computer and copy the KML file from your computer to the mission folder.
If I need to stop a mission while it is in progress and return to launch, do I have to start the mission over completely from the first waypoint on the next launch?
No, the mission does not need to be restarted. A pause feature exists that allows you to pause the mission in order to land, power down (or hot-swap if using one) the batteries, repower, and resume the mission from the most recent waypoint before the pause. Below are the steps to achieve this:
Select the pause button on the left toolbar (typically, try to pause immediately after the drone has just passed a waypoint in the mission).
Return the drone to launch and land.
Once landed, a “Flight Plan” menu will appear on the right side of the screen. You will see a few options, one being “Resume Mission From Waypoint X?” Select this option to resume from the last waypoint the drone reached in the mission when relaunched.
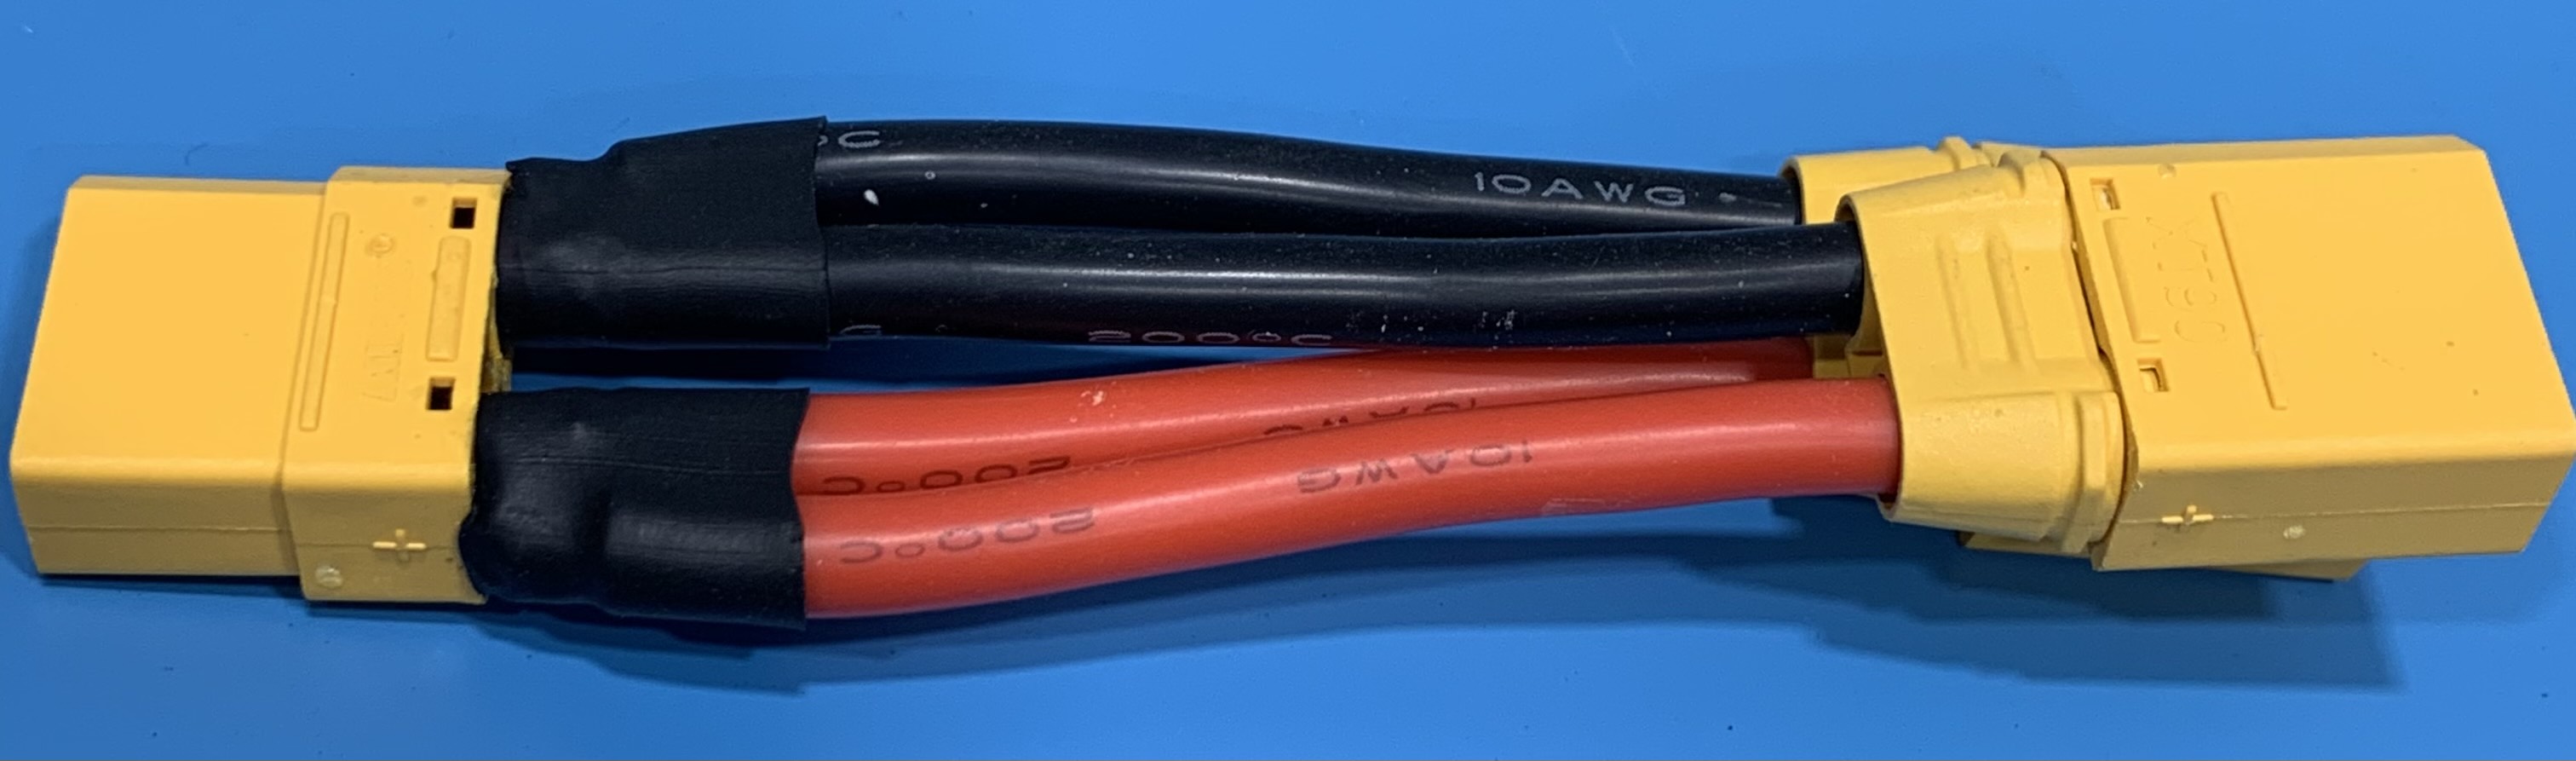
Wispr offers a hot-swap cable option included in all packages.
An important part of Wispr drone packages is the hot-swap cable, which is inserted into the front of the drone where the battery is usually plugged in. The hot-swap cable is not necessary for every flight, but is used when the drone is returned to launch to allow the pilot to replace a depleted battery without shutting down the drone. This is done by connecting the fresh battery to the unoccupied XT90 plug, and unplugging the depleted battery from the occupied plug. This switch needs to be done rather quickly. When the plug swap is complete, remove the depleted battery from the drone in order to load the fresh one.
Give this video below a watch for a visual reference on the steps listed above:
Continuing a Mission from the Previous Waypoint
Planning Photogrammetry Missions with WisprGroundControl
This video will show you everything you need to know to get started with survey mission planning, the standard for photogrammetry operations.
Planning a LiDAR Mission using WisprGroundControl
This video will walk you through the necessary steps required to plan and conduct a survey mission using a LiDAR payload. The LiDAR featured in the video is the Avia Livox AA450.
Payloads
General Payload Information
My gimbal will not tilt by using the roll-wheel. What could be the problem?
Solutions:
Ensure the gimbal is receiving power.
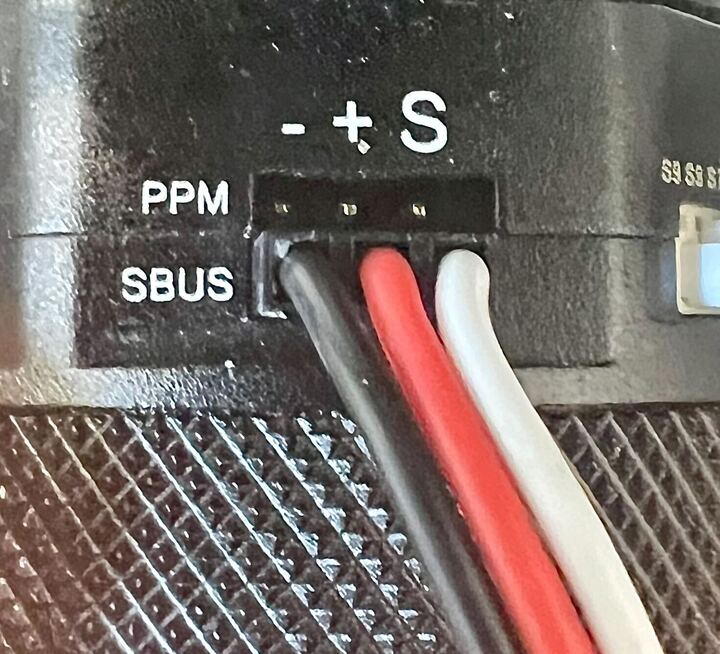
Verify the SBUS cable is completely plugged in and no wires feel loose.
Make sure the SBUS cable and be sure the cable is properly plugged in. The wires from left to right should be Black/Red/White, as seen below:

My gimbal pitch doesn’t adjust while running a mission. What could be the problem?
Solutions:
Try to take a picture with the Take Picture button on your Smart Controller (soft touch buttons).
Watch the camera controller while taking a picture with the soft buttons. You should see a white flash every time you take a picture.
Check that the Entire status light is blue. This means it is in the ready state.
Ensure your gimbal pitch is correct under the mission tab when planning your mission. The gimbal pitch that is selected is the angle the gimble will be set to while running the mission.
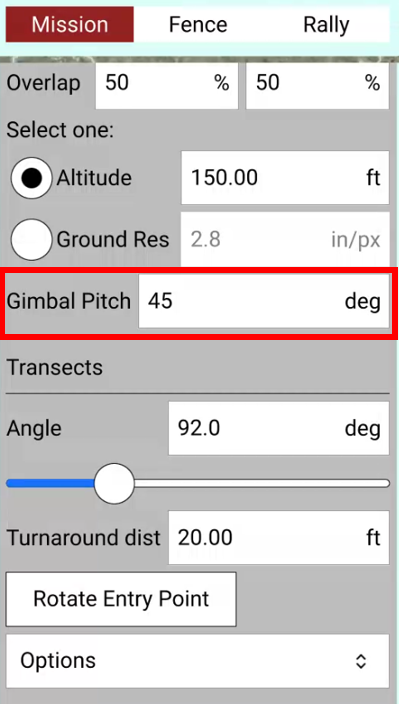
What if my Gimbal Pitch isn’t set to the angle I would like when planning a survey?
You may change the Gimbal Pitch to a custom angle once you’ve selected “Done with Polygon” and have the polygon the size you would like it, you may now change the gimbal pitch under the mission tab, selecting the correct pitch you would like to run the mission at.
The Gimbal Pitch will default to 90 degrees when running a survey with a camera payload selected, if you do not input a custom gimbal pitch.
See Gimbal Pitch in the image above.
What is the max wind speed I can fly in while having a steady payload?
With Wispr Drones, you can fly in 45 MPH wind gusts and your payload will remain steady while capturing reliable data and photos. While our drones can tolerate heavy winds, we suggest flying in the most stable weather conditions possible for maximum performance and stability.
When flying in high winds, especially strong gusts, be very cautious and aware of the drone’s stability. If at any time you feel uncomfortable flying in higher winds, you should return to launch and land the drone.
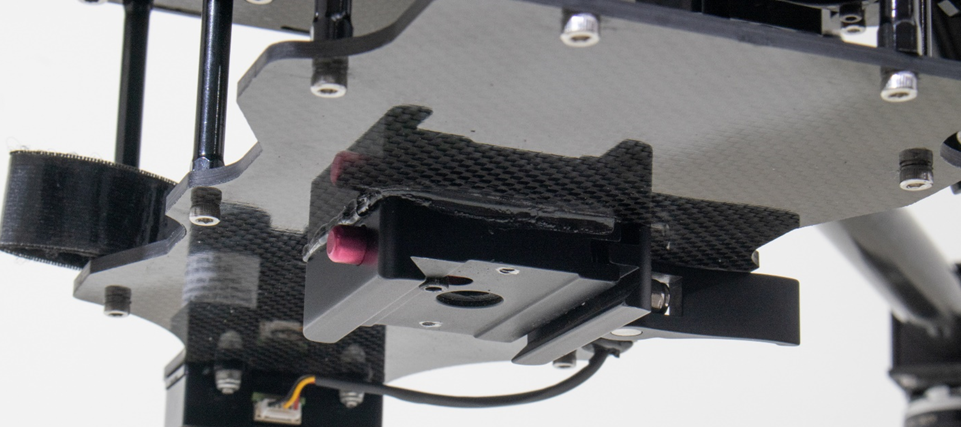
What should I do if the lever on my dove tail mount feels loose?
This can be fixed by tightening the nut on the lever. If this cannot be accomplished contact Wispr to have this replaced. Having a loose dove tail mount could lead to erratic flight, poor streaming from the payload, or even loss of the payload.
Camera Payloads
For some videos and information not listed on this page, check out our quick start guide:
Camera Payload Quickstart and Best Practice Guide
Sony A7R
When picking the Sony A7R in the payload setting dropdown of WisprGroundControl or in the survey, configurations will change to the default settings Wispr has set for that payload. Changing this may result in mission configurations that do not match ideal values for the mission you wish to conduct. These values may be a changed as needed when planning a new mission.
My pictures are blurry when taking pictures manually or running a mission. How can I make future pictures clearer?
Make sure that there are no smudges on the camera lens that would cause a glare.
If taken pictures appear blurry, be sure the lighting outside is allowing the camera to Auto Focus. Presence of a heavy overcast can have an impact on this.
If pictures look good after a mission but somewhat blurry on zoom-in, be sure you are running the mission at the correct flight speed. The default configuration for the mission speed on photogrammetry missions is 5 m/s. This can be adjusted at any time, but can also cause picture quality to drop as a result. Find the speed that produces the best results for you and adhere to it, unless other factors require you to make changes.
What if the camera feed displays the camera going in and out of mass data storage mode?
Unplug the multi-port cable (top USB-C cable plugged into the side of the camera). Unplug the drone and repower it. Once powered on and WisprGroundControl has loaded the parameters, plug the multi-port cable back into the port.
The camera takes multiple pictures when pressing the camera button on the controller. How can I fix this?
This is a setting that can be changed. Navigate to Menu Settings → Shoot Mode → Drive Mode → Change to Single Shooting.
The following message appears on the camera screen: “The operation and safety of this battery cannot be guaranteed”
When this message appears, it suggests the Dummy Battery in your camera is degrading. While this should have no effect on the operation of the camera, it will produce this message dialog that the user must clear before use. For a replacement Dummy Battery, contact Customer Support.
An older picture is displayed in the video feed. How can I receive the live stream?
Press the Auto Focus (AF) button.
Press the “take picture” button on the Sony Camera.
Take a picture using the physical button on the top right of your controller. The Auto Focus button should be tried before using this method.
Note that it may take a couple of tries with each of these respective methods, a bit of patience is sometimes required. Try 5-10 times at least for each one. Generally, one of these solutions will resolve the issue.
If the camera feed isn’t appearing, what should I do?
Verify that the camera is receiving power and is powered on.
Take a picture using the physical camera trigger button on the top right of your controller.
Examine the connectors and ribbon of the HDMI ribbon cable for any significant damage that might effect data transmission.
Check the ports and connectors of your HDMI ribbon to make sure there are are no loose connections. All connectors should be snug when plugged into the HDMI ports.
Leave the HDMI ribbon unplugged from the front mini-HDMI port of the drone until the drone has finished booting, and then plug the HDMI back into the camera
If drone is already powered on, unplug the HDMI cable and plug it back in.
Take a picture manually using the button on the camera itself. Be sure to do this several times if necessary and give it some patience, as generally this step is a reliable way to return the camera feed.
If all of these look good, you should close out of WisprGroundControl and reboot the drone. The camera feed should appear after the next bootup.
After taking off, the camera is going into mass storage (geotagging mode). The camera is dumping the data once the flight is over (going back into mass storage mode), but the images aren’t being geotagged. What could be the problem?
After taking pictures, once the drone has landed, give it time to move the data to the pictures saved on the SD card.
Once landed, you should see it enter mass storage mode. It is now moving the data onto the pictures on the SD card. Always wait for it to finish this process to ensure you get the data captured with the pictures.
Check that your SD card is inserted into the Air Commander completely.
Verify that your SD card has the pictures on it
If the pictures are not on the SD card in the Air commander you should:
Try clearing and reformatting the Micro SD card
Check for any damage to the Micro SD card. If any damage can be seen, replace the Micro SD card.
Check your camera settings and be sure mass storage is selected.
Reformat the SD Card through the Sony camera.
Reformat the MicroSD Card through the Entire.
Pictures are not being saved on the SD card in my A7R correctly. How do I resolve this?
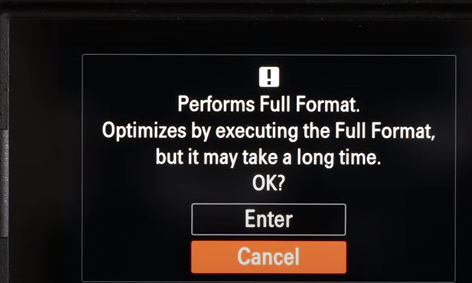
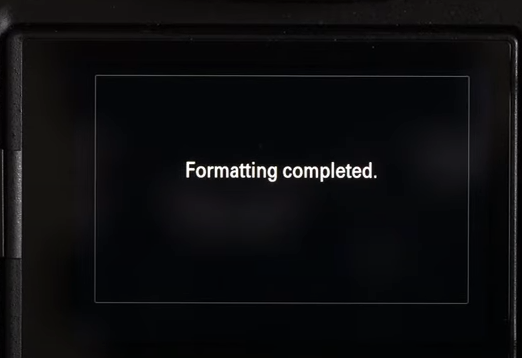
Format the SD card through the camera settings. To do this, go to media in your camera menu. You will see the option to format. Rotate the roll-wheel, and select enter by pressing the center button of the roll-wheel to begin formatting. You will receive a message that the card has been successfully formatted when it is complete.
WIRIS Enterprise
What should I do if my WIRIS camera does not have camera control?
First make sure that your WIRIS Camera is receiving power and is powered on.
Open WisprGroundControl and select the Wispr button in the top left. You should be taken to the General tab. Under payload, be sure WIRIS is selected from the drop down menu.
Verify that your Air Commander is powered on and you can see a blue LED illuminated.
Press the Take Picture button on the WisprGroundControl screen, and see if the Air Commander receives the command. To confirm this, after giving the command you will see the blue LED on the Air Commander blink white, and then return to blue.
Check to make sure you see that no cables are loose, cut, or that any wires slid out of the connectors going from the I/O ports to the gimbal.
If you try all of these steps and still do not have camera control, please visit https://wisprsystems.atlassian.net/servicedesk/customer/portal/3/group/11/create/38 to get a replacement wire harness or have your payload returned for service.
To help you get started using the WIRIS Enterprise with the Wispr Ranger Pro, check out the video linked below:
WIRIS Enterprise Quick Start for the Ranger Pro
Companion Computer
How can I update my companion computer to the newest version of the OS?
To update your companion computer, power up your drone and navigate to the Wispr Air OS by typing 172.16.1.1 in your address bar.
Once there, select the ≡ → Wi-Fi, and put in your Wi-Fi credentials to connect the Wispr OS to your WIFI SSID. You will receive a “Connected to your Wi-Fi [SSID Name]” confirmation.
Select the ≡, Update, and then in the dialogue box select Update again. This process could take up to a few minutes for the update to complete. DO NOT UNPLUG WHILE UPDATING, AS THIS WILL CAUSE CORRUPTION OF THE IMAGE ON THE CARD IN THE COMPANION COMPUTER.
Once updated you will get a “Successfully Updated” message. Reboot your drone, and your companion computer is updated. This can be verified by going to 172.16.1.1 and checking that the version number at the top has updated to a never version number than seen before.
What if I cannot connect to the Prism but I am able to connect to the OS and Flight Controller?
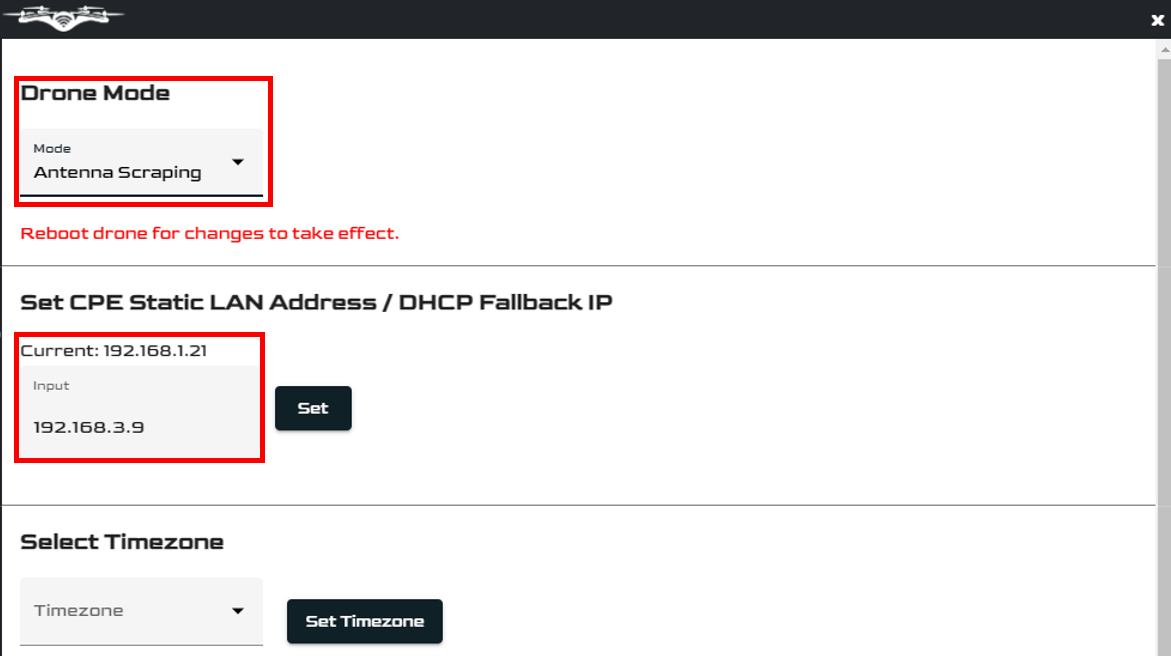
Ensure you have Drone Mode set to Antenna Scraping and the CPE Static LAN Address/DHCP Fallback IP set to 192.168.3.9. This verifies you have the correct information configured under System Management → Settings inside of the OS. Performing these steps will allow you to connect to the Prism GUI in another tab while being connected to the Wispr OS.
If either of these values are changed, reboot the drone in order for this to take save and take effect. Once rebooted, connect back to the Wispr OS (172.16.1.1) and now you should be able to access the Prism GUI (192.168.3.1). If the Prism GUI can not be accessed, return to the System Management → Settings in Wispr OS and verify that the changes made in the DHCP Fallback IP saved to 192.168.3.9. If not, repeat the above steps once more.
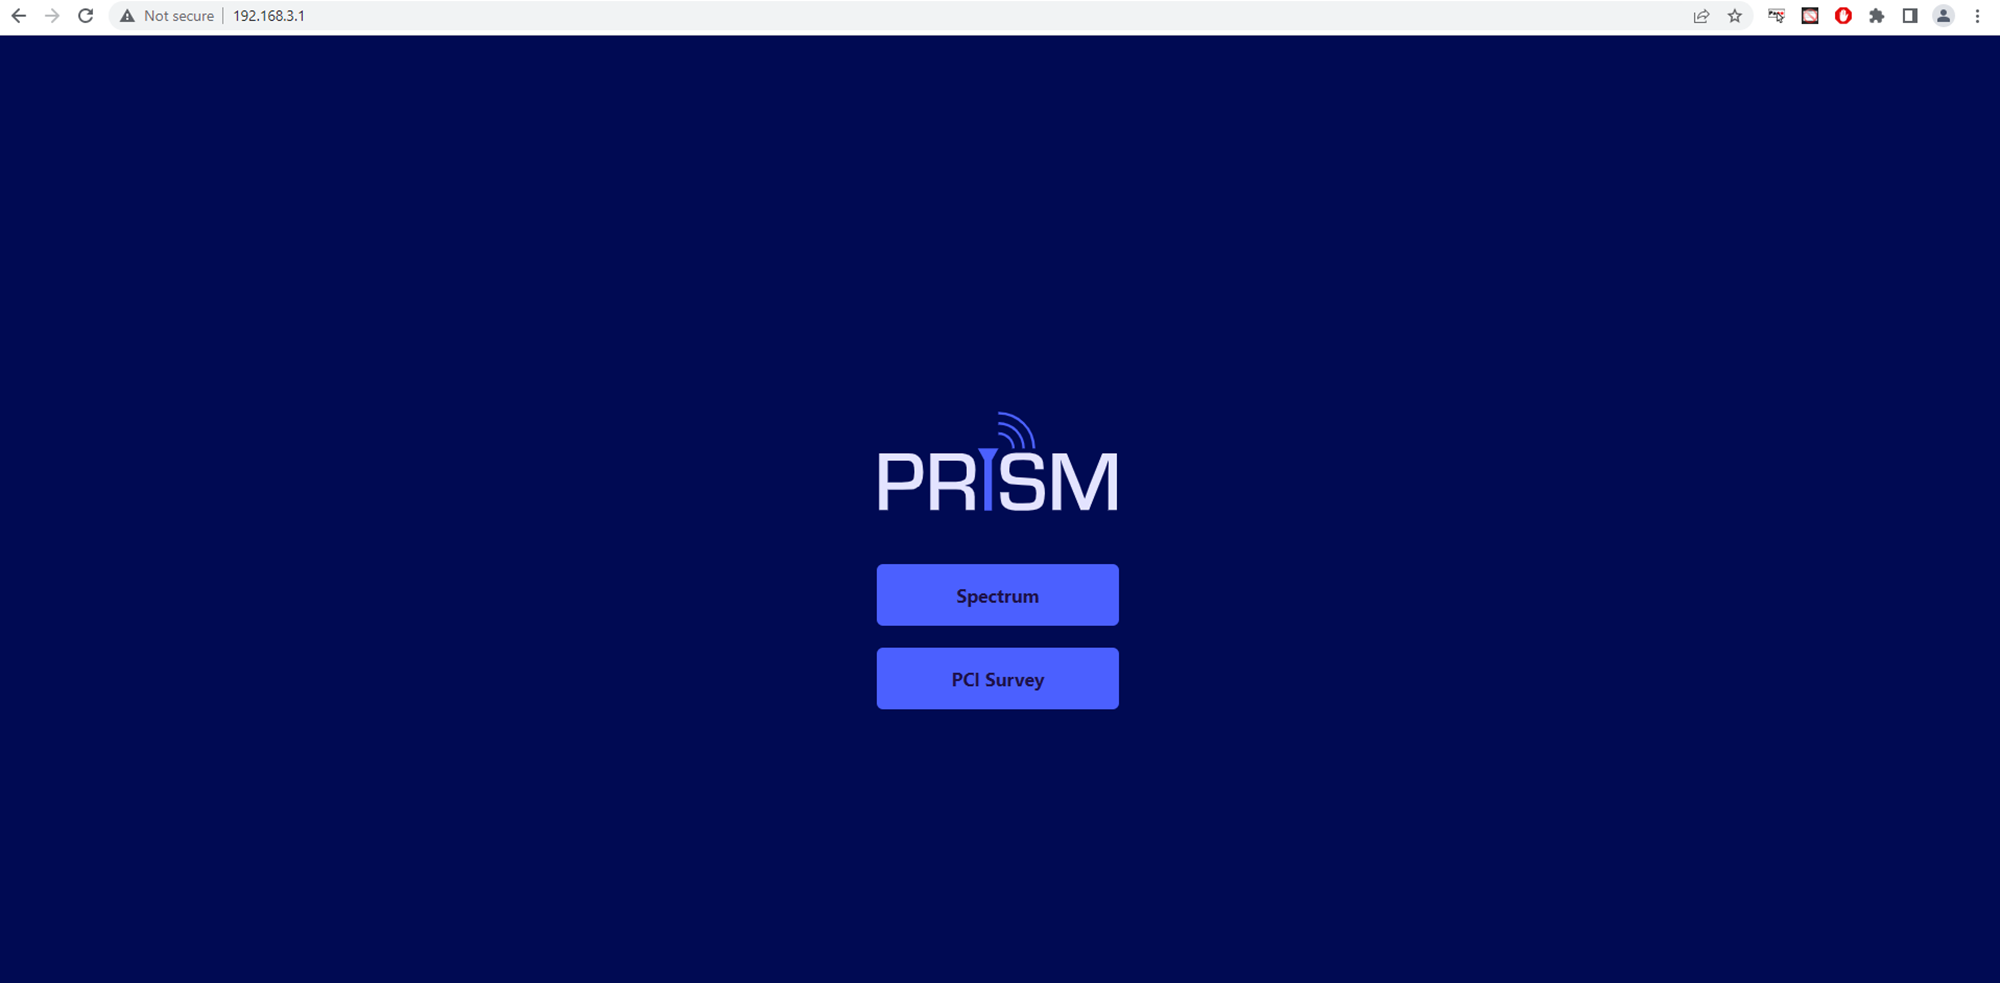
You will now be able to log into the Prism’s GUI at the address 192.168.3.1.
The home GUI of the Prism will look like this. Once you reach this page you are now connected to the Prism and ready to run a survey.
To find the information listed here alongside more information about the Prism, follow this link to our quick start guide:
Prism Quick Start Guide
I have the Prism connected to my companion computer. The Flash Drive connected to the companion computer is not saving data after a survey is complete. What is the issue?
The Prism and Flash Drive must be connected to the companion computer USB Port before powering on the drone, in order to collect data correctly.
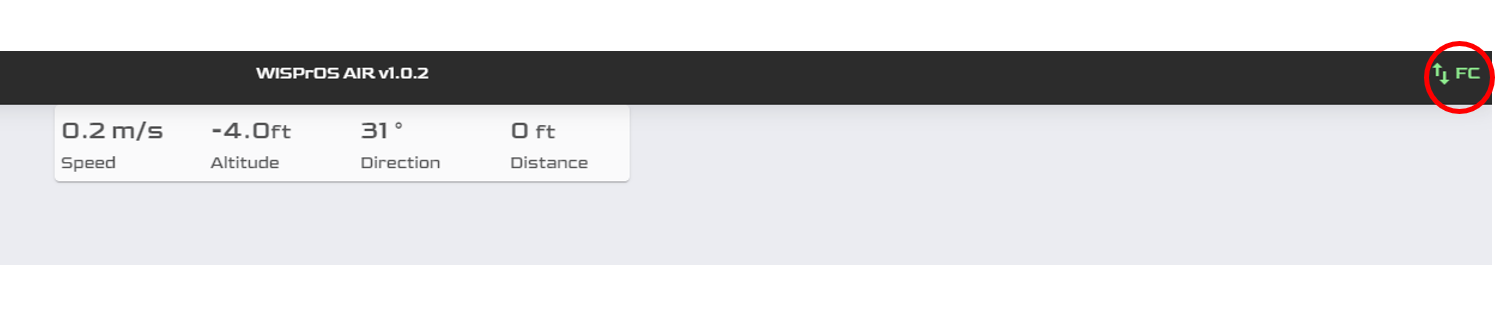
Verify that the Flight controller (FC) is connected.
You can do this by entering into the Wispr OS at the address 172.16.1.1. If the FC is connected, you will see an icon reading “FC” with 2 arrows, blinking green (one pointing up, one down). This means you are connected to the flight controller using telemetry.
Check your Flash Drive format, as it needs to be formatted into the FAT32 format. If your Flash Drive is larger than 32GB you will need to use a program (if you are using a windows computer) to format it to FAT32. Windows only allows up to 32GB and smaller to format to FAT32. Wispr suggest using this Program and following the steps to format your Flash Drive to FAT32, if you are using a SanDisk Flash Drive (We send all of our companion computers with SanDisk Flash Drives)
If you are using another brand other than SanDisk, there are other programs available online that will allow you to format them. We suggest using the SanDisk Flash Drive sent by Wispr to ensure data captures correctly.
Check that you are able to access the Prism GUI Homepage at the address 192.168.3.1. If you cannot connect to this you will not gather data.
See below to check possible issues
Go to the Wispr OS (172.16.1.1) under System Management → Settings. Check the fallback DHCP is set to 192.168.3.9. If not change to that IP and reboot the drone for that to take effect.
Check the USB C cable for any damage. If plugged in correctly, the STAT button should be blinking green to let you know you are getting power.
Check that your Prism IP default is 192.168.3.1. You can check this by plugging the Prism USB cable directly into your computer and accessing that IP address in the address bar.
If you are unable to connect directly through your computer using that IP address, either the IP is set to a different IP address than the default or your USB-C cable is not working properly.
LiDAR Information
When surveying with LiDAR, what coordinate datum should you use when using a PPK base?
When surveying with LiDAR, WGS84 must be used on the PPK base. After you are done processing the LiDAR data it can be converted to NAD83 or any other state plane for review.
What speed will the drone RTL at after completing a LiDAR mission?
If a LiDAR payload is selected in WisprGroundControl, once the mission is complete the drone will RTL at a set speed of 10m/s, which is the default RTL speed for a LiDAR mission.
How do I post process data with Inertial Labs LiDAR?
First you’ll need to install the processing software used to post process the LiDAR data you’ve collected.
Please note the following computer requirements are necessary to process LiDAR data:
Intel Core i7, Ryzen 8, or better.
32 GB RAM.
Nvidia GeForce GTX 1050 Ti or better. (4GB of Digital RAM minimum)
Windows OS.
Check out the video below for a walkthrough on the installation of the software.
LiDAR Processing Software Installation
Now that you have your software installed, next you will need to actually process the data. For a full walkthrough of the steps necessary to accomplish this, please watch the video listed below:
Post Processing of LiDAR data Walkthrough using PCMaster
Please note that Windows 11 should not be used when processing data. Windows 11 can skew the time of the data as well as the data itself. Avoid using this when you process your data. Windows 10 is suggested.
Operations
Flight Modes:
Loiter - Loiter Mode automatically attempts to maintain the current location, heading and altitude. The user will manually control these aspects of flight with the joysticks, but when the sticks are released, the vehicle will slow to a stop and hold position. The drone should ALWAYS be flown in loiter mode if flying manually. This is mapped to the A button on Wispr controllers.
WisprGroundControl automatically sets the flight mode to loiter when booted.
Altitude Hold - When Altitude Hold mode is selected, the throttle automatically controls the current altitude. The drone will remain steady at its current altitude using the barometer, but will drift in potentially any direction, as it is not reading from the GPS in this mode. The joysticks on the controller should be used to maintain position to the best of your ability. Altitude hold should ONLY be used in an emergency situation such as a failed GPS, or if the drone is losing stability in flight. This is mapped to the B button on Wispr controllers.
Land - Automatically attempts to descend the drone directly below its current position, land, and disarm. To prevent crashes, it is strongly urged that the user does not adjust position of the drone when attempting to land. This is mapped to the C button on Wispr controllers.
Return To Launch (RTL) - The drone will ascend to the designated altitude before orienting itself toward home, and when positioned above the launch location will lower itself to the ground before disarming upon touchdown. This is mapped to the D button on Wispr controllers.
Auto Flight Mode - This mode is exactly what it sounds like- automatic. This mode comes into play when conducting missions, and directs the drone to carry out the instructions written in the mission that has been planned. The drone will fully complete the sequence and return to launch unless interrupted.
Guided Flight Mode - Guided flight mode is a lesser used mode that is only applicable for a few functions of flight. This mode functions similarly to Auto flight mode, but applies to smaller sequences that might be performed one or more times in a flight, as well as before conducting a mission. This mode is active when performing a LiDAR calibration, a bridge scan, or a go-to sequence.
If my drone is not flying smoothly, what should I do?
Check that the payload, propellers, screws and landing gear are all secure.
Verify that no errors are being triggered in WisprGroundControl.
If the compass (GPS) has bumped into an object, door, etc. or has been damaged in some way, this can also cause the drone to not fly smoothly. In a worst case scenario, a crash could occur.
It may be necessary to recalibrate the GPS if the flight characteristics observed appear quite unstable.
Note: if you are flying on a windy day, you will observe some movements that are a result of the drone trying to counteract the wind it is in the path of. The more you fly, the better you will be able to discern if the flight behavior you’re seeing is abnormal, or a result of the drone holding its position.
What is RTK and when should I use it?
RTK is a navigation system that offers very precise position accuracy of your drone. The RTK system is always in use on the drone’s GPS, but can be enhanced with a better signal by using a ground station that communicates with satellites and provides real-time location during the flight.
RTK can be used when you are in an area where your GPS is picking up a low amount of satellites or you have no GPS at all.
RTK can be used with mapping and LiDAR, as it will ensure your drone remains steady horizontally and vertically. This is key in getting accurate results and enhanced positional data down to a centimeter resolution while mapping.
RTK is also used with the Air commander. The Air commander supports writing of GPS/RTK and gimbal angles from your flight controller directly to the EXIF of photos in the camera SD card.
How do I set up my RTK system to work with a Wispr drone?
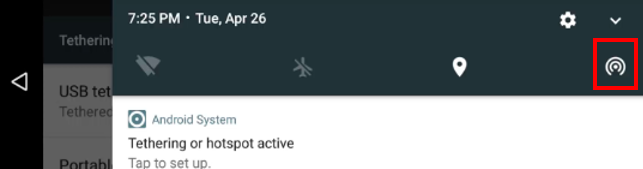
To connect your RTK system to your drone, you will need to first make sure you have the Portable Wi-Fi hotspot enabled (on the smart controller) which you can find in the Wireless & Networks section.
Turn the option on using the toggle switch in settings. To do this you can swipe down from the top of the screen and select the icon on the far right to activate tethering.

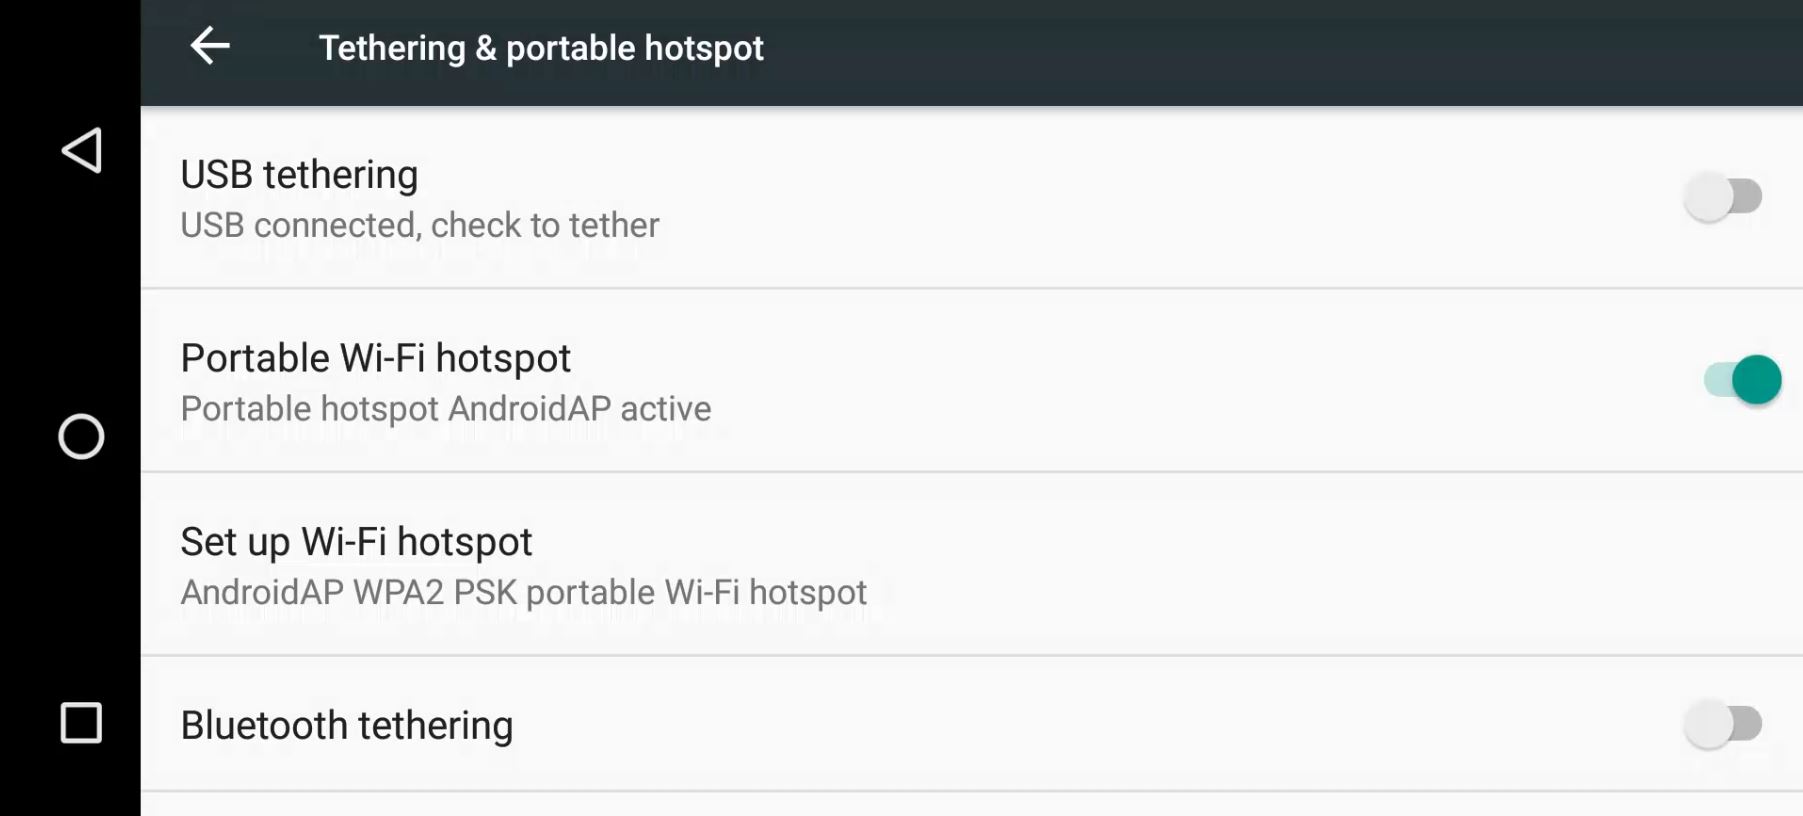
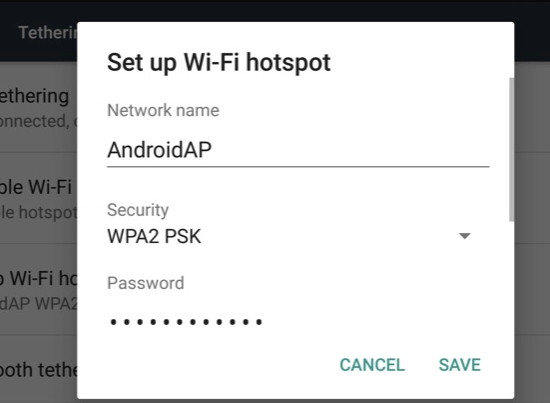
Set up your Wi-Fi hotspot with a network name and password then select save. Now you can connect to your tethered Wi-Fi hotspot under your Wi-Fi list.
Open the General Settings tab in WisprGroundControl and scroll to the bottom to the NTRIP section.
Enable the NTRIP server by ticking the box and enter your NTRIP information. Once done, reboot the drone and WisprGroundControl.
You are connected to the RTK base if when clicking the satellite icon in the fly bar you see “3D RTK GPS Lock (Fixed)” informing you that you are now connected to your RTK Base.
For a walkthrough video, visit this link: RTK with WISPRGroundControl Quick Start Video
How do I connect my Here+ RTK to the Wispr Drone through WisprGroundControl?
Please read this manual for a walkthrough of connecting your Here+ RTK to your Drone through WisprGroundControl - Using Here+ RTK With Wispr Ground Control
How much power is supplied from the front XT60 power output port?
24 Volts. Although it is an unregulated 6S voltage, which is 21-26.1 volts.
How often should I get my Drone tuned up?
Your drone should be tuned every 200 hours of flight time. You can visit this form https://forms.zohopublic.com/support1745/form/AppointmentBookingForm/formperma/G_bYP13RqCLFI2zE9OqpVP6YISfJI-vm__l5T0WaUiE and fill it out to schedule a Drone tune-up.
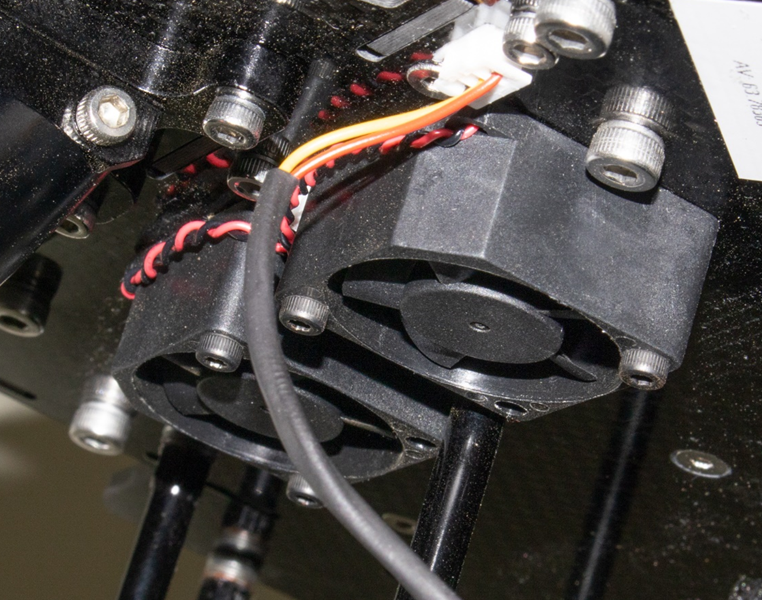
If one of the cooling fans under the bottom plate stops spinning, is it still ok to fly the drone?
No! If a fan stops working, please put in a ticket here: https://wisprsystems.atlassian.net/servicedesk/customer/portal/3/group/11/create/38 to get the fan replaced. The drone needs all 4 fans to help cool the inside of the drone to prevent overheating. DO NOT fly if you are aware a fan is not working. This could lead to overheating and the drone malfunctioning.
What mode should be used to land the drone if not loiter?
Land mode should be used. The land command (the C button on the controller packaged with Wispr drones) should be issued 6-15 ft from the ground. The user should always use the Land command to land the drone, unless it is not an option due to circumstances such as safety or a crash hazard.
If this is the case, the drone may be descended, landed manually using the joysticks, and disarmed by holding the left joystick down and to the left. This is for emergency cases only. If the Land command or Return To Launch (home button) is available, these should always be used as your first options before a manual landing. Manual landing is reserved for emergency situations such as to avoid injury or destruction of property.
Alternatively, the user can always issue an RTL (Return To Launch) command.
Note that in some cases the user may observe the position of the drone’s target landing spot to be suboptimal, and need to reposition for safe landing. We never recommend adjusting the position of the drone when it is in an RTL or Land sequence. If you feel you need to reposition for landing, shift to loiter beforehand, and then shift back to land when you are happy with your positioning.
General FAQs’
Can the volume of the smart controller be muted/unmuted from inside of WisprGroundControl?
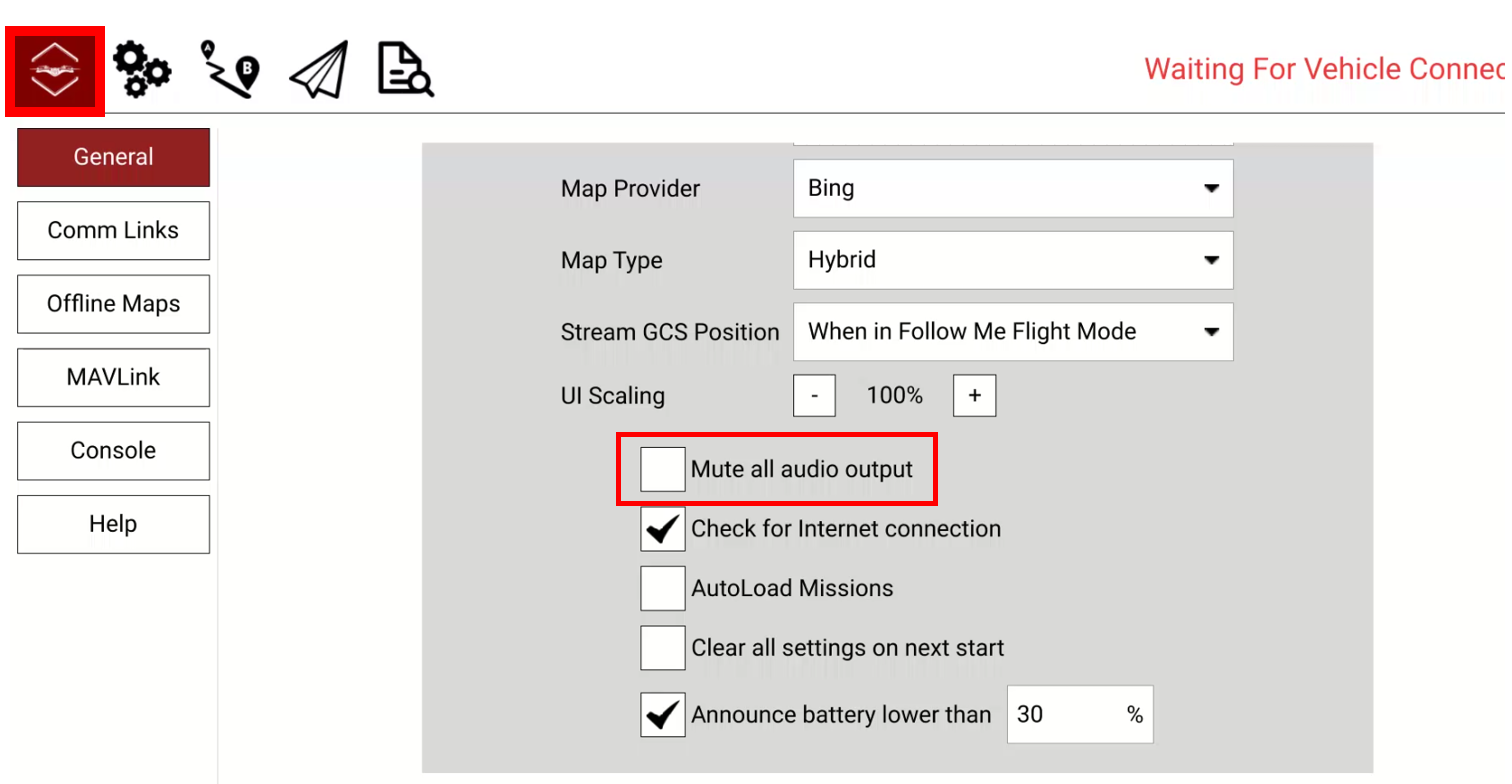
Yes. You can mute all audio output if needed by navigating to the General Settings, then scroll down and check the “Mute all audio output” selection box as seen below. To unmute, uncheck the “Mute all audio output” box.
I’ve tried to upload a new version of WGC Flight Firmware through Mission Planner and I get the error “Cannot Read Board”. How can this be fixed?
If you try to load the Custom Flight Firmware onto the drone and you have confirmed everything is connected correctly but you still get this error, check the top right of Mission Planner and ensure the COM port is set to Auto. If it is set to anything else you will not be able to load the Custom Flight Firmware, resulting in this error message.
How do I use the Offline Maps feature and what is its purpose?
Offline maps are a good tool to utilize if you are going to be flying at a later time in an area without Wi-Fi access, but still will need to access maps while flying. Without Wi-Fi, you will not be able to download the maps of the area you are flying in unless previously downloaded through offline maps while connected to a Wi-Fi network to save them.
Here is a guide on how to download and use them on your smart controller : Downloading Maps While Offline and Setting Terrain Follow