Table of Contents
| Child pages | ||
|---|---|---|
|
Camera Payloads
| Info |
|---|
For some videos and information not listed on this page, check out our quick start guide: |
Sony A7R
| Panel | ||||||
|---|---|---|---|---|---|---|
| ||||||
When picking the Sony A7R in the payload setting dropdown of WisprGroundControl or in the survey, configurations will change to the default settings Wispr has set for that payload. Changing this may result in mission configurations that do not match ideal values for the mission you wish to conduct. These values may be a changed as needed when planning a new mission. |
My pictures are blurry when taking pictures manually or running a mission. How can I make future pictures clearer?
Make sure that there are no smudges on the camera lens that would cause a glare.
If taken pictures appear blurry, be sure the lighting outside is allowing the camera to Auto Focus. Presence of a heavy overcast can have an impact on this.
If pictures look good after a mission but somewhat blurry on zoom-in, be sure you are running the mission at the correct flight speed. The default configuration for the mission speed on photogrammetry missions is 5 m/s. This can be adjusted at any time, but can also cause picture quality to drop as a result. Find the speed that produces the best results for you and adhere to it, unless other factors require you to make changes.
What if the camera feed displays the camera going in and out of mass data storage mode?
Unplug the multi-port cable (top USB-C cable plugged into the side of the camera). Unplug the drone and repower it. Once powered on and WisprGroundControl has loaded the parameters, plug the multi-port cable back into the port.
The camera takes multiple pictures when pressing the camera button on the controller. How can I fix this?
This is a setting that can be changed. Navigate to Menu Settings → Shoot Mode → Drive Mode → Change to Single Shooting.
The following message appears on the camera screen: “The operation and safety of this battery cannot be guaranteed”
When this message appears, it suggests the Dummy Battery in your camera is degrading. While this should have no effect on the operation of the camera, it will produce this message dialog that the user must clear before use. For a replacement Dummy Battery, contact Customer Support.
An older picture is displayed in the video feed. How can I receive the live stream?
Press the Auto Focus (AF) button.
Press the “take picture” button on the Sony Camera.
Take a picture using the physical button on the top right of your controller. The Auto Focus button should be tried before using this method.
Note that it may take a couple of tries with each of these respective methods, a bit of patience is sometimes required. Try 5-10 times at least for each one. Generally, one of these solutions will resolve the issue.
If the camera feed isn’t appearing, what should I do?
Verify that the camera is receiving power and is powered on.
Take a picture using the physical camera trigger button on the top right of your controller.
Examine the connectors and ribbon of the HDMI ribbon cable for any significant damage that might effect data transmission.
Check the ports and connectors of your HDMI ribbon to make sure there are are no loose connections. All connectors should be snug when plugged into the HDMI ports.
Leave the HDMI ribbon unplugged from the front mini-HDMI port of the drone until the drone has finished booting, and then plug the HDMI back into the camera
If drone is already powered on, unplug the HDMI cable and plug it back in.
Take a picture manually using the button on the camera itself. Be sure to do this several times if necessary and give it some patience, as generally this step is a reliable way to return the camera feed.
If all of these look good, you should close out of WisprGroundControl and reboot the drone. The camera feed should appear after the next bootup.
After taking off, the camera is going into mass storage (geotagging mode). The camera is dumping the data once the flight is over (going back into mass storage mode), but the images aren’t being geotagged. What could be the problem?
After taking pictures, once the drone has landed, give it time to move the data to the pictures saved on the SD card.
Once landed, you should see it enter mass storage mode. It is now moving the data onto the pictures on the SD card. Always wait for it to finish this process to ensure you get the data captured with the pictures.
Check that your SD card is inserted into the Camera Controller completely.
Verify that your SD card has the pictures on it
If the pictures are not on the SD card in the Camera Controller you should:
Try clearing and reformatting the Micro SD card
Check for any damage to the Micro SD card. If any damage can be seen, replace the Micro SD card.
Check your camera settings and be sure mass storage is selected.
Reformat the SD Card through the Sony camera.
Reformat the MicroSD Card through the Entire.
Pictures are not being saved on the SD card in my A7R correctly. How do I resolve this?
Format the SD card through the camera settings. To do this, go to media in your camera menu. You will see the option to format. Rotate the roll-wheel, and select enter by pressing the center button of the roll-wheel to begin formatting. You will receive a message that the card has been successfully formatted when it is complete.
...
WIRIS Enterprise
What should I do if my WIRIS camera does not have camera control?
First make sure that your WIRIS Camera is receiving power and is powered on.
Open WisprGroundControl and select the Wispr button in the top left. You should be taken to the General tab. Under payload, be sure WIRIS is selected from the drop down menu.
Verify that your Camera Controller is powered on and you can see a blue LED illuminated.
Press the Take Picture button on the WisprGroundControl screen, and see if the Camera Controller receives the command. To confirm this, after giving the command you will see the blue LED on the Camera Controller blink white, and then return to blue.
Check to make sure you see that no cables are loose, cut, or that any wires slid out of the connectors going from the I/O ports to the gimbal.
If you try all of these steps and still do not have camera control, please visit https://wisprsystems.atlassian.net/servicedesk/customer/portal/3/group/11/create/38 to get a replacement wire harness or have your payload returned for service.
| Panel | ||||||
|---|---|---|---|---|---|---|
| ||||||
To help you get started using the WIRIS Enterprise with the Wispr Ranger Pro, check out the video linked below: |
WIRIS Enterprise Quick Start for the Ranger Pro
| Widget Connector | ||||||||||
|---|---|---|---|---|---|---|---|---|---|---|
|
Companion Computer
How can I update my companion computer to the newest version of the OS?
To update your companion computer, power up your drone and navigate to the Wispr Air OS by typing 172.16.1.1 in your address bar.
Once there, select the ≡ → Wi-Fi, and put in your Wi-Fi credentials to connect the Wispr OS to your WIFI SSID. You will receive a “Connected to your Wi-Fi [SSID Name]” confirmation.
Select the ≡, Update, and then in the dialogue box select Update again. This process could take up to a few minutes for the update to complete. DO NOT UNPLUG WHILE UPDATING, AS THIS WILL CAUSE CORRUPTION OF THE IMAGE ON THE CARD IN THE COMPANION COMPUTER.
Once updated you will get a “Successfully Updated” message. Reboot your drone, and your companion computer is updated. This can be verified by going to 172.16.1.1 and checking that the version number at the top has updated to a never version number than seen before.
What if I cannot connect to the Prism but I am able to connect to the OS and Flight Controller?
Ensure you have Drone Mode set to Antenna Scraping and the CPE Static LAN Address/DHCP Fallback IP set to 192.168.3.9. This verifies you have the correct information configured under System Management → Settings inside of the OS. Performing these steps will allow you to connect to the Prism GUI in another tab while being connected to the Wispr OS.
If either of these values are changed, reboot the drone in order for this to take save and take effect. Once rebooted, connect back to the Wispr OS (172.16.1.1) and now you should be able to access the Prism GUI (192.168.3.1). If the Prism GUI can not be accessed, return to the System Management → Settings in Wispr OS and verify that the changes made in the DHCP Fallback IP saved to 192.168.3.9. If not, repeat the above steps once more.
...
You will now be able to log into the Prism’s GUI at the address 192.168.3.1.
The home GUI of the Prism will look like this. Once you reach this page you are now connected to the Prism and ready to run a survey.
...
| Info |
|---|
To find the information listed here alongside more information about the Prism, follow this link to our quick start guide: |
I have the Prism connected to my companion computer. The Flash Drive connected to the companion computer is not saving data after a survey is complete. What is the issue?
The Prism and Flash Drive must be connected to the companion computer USB Port before powering on the drone, in order to collect data correctly.
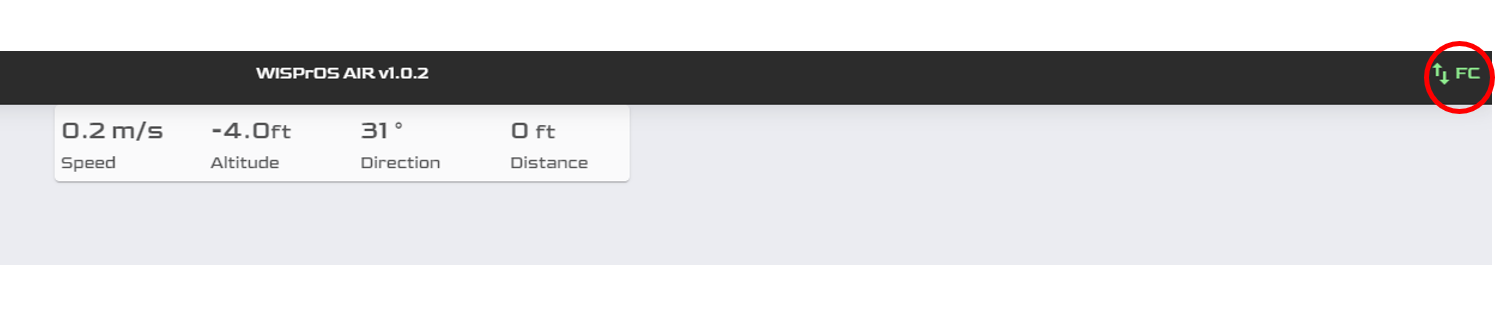
Verify that the Flight controller (FC) is connected.
You can do this by entering into the Wispr OS at the address 172.16.1.1. If the FC is connected, you will see an icon reading “FC” with 2 arrows, blinking green (one pointing up, one down). This means you are connected to the flight controller using telemetry.
Check your Flash Drive format, as it needs to be formatted into the FAT32 format. If your Flash Drive is larger than 32GB you will need to use a program (if you are using a windows computer) to format it to FAT32. Windows only allows up to 32GB and smaller to format to FAT32. Wispr suggest using this Program and following the steps to format your Flash Drive to FAT32, if you are using a SanDisk Flash Drive (We send all of our companion computers with SanDisk Flash Drives)
If you are using another brand other than SanDisk, there are other programs available online that will allow you to format them. We suggest using the SanDisk Flash Drive sent by Wispr to ensure data captures correctly.
Check that you are able to access the Prism GUI Homepage at the address 192.168.3.1. If you cannot connect to this you will not gather data.
See below to check possible issues
Go to the Wispr OS (172.16.1.1) under System Management → Settings. Check the fallback DHCP is set to 192.168.3.9. If not change to that IP and reboot the drone for that to take effect.
Check the USB C cable for any damage. If plugged in correctly, the STAT button should be blinking green to let you know you are getting power.
Check that your Prism IP default is 192.168.3.1. You can check this by plugging the Prism USB cable directly into your computer and accessing that IP address in the address bar.
If you are unable to connect directly through your computer using that IP address, either the IP is set to a different IP address than the default or your USB-C cable is not working properly.
LiDAR Information
When surveying with LiDAR, what coordinate datum should you use when using a PPK base?
When surveying with LiDAR, WGS84 must be used on the PPK base. After you are done processing the LiDAR data it can be converted to NAD83 or any other state plane for review.
What speed will the drone RTL at after completing a LiDAR mission?
If a LiDAR payload is selected in WisprGroundControl, once the mission is complete the drone will RTL at a set speed of 10m/s, which is the default RTL speed for a LiDAR mission.
How do I post process data with Inertial Labs LiDAR?
First you’ll need to install the processing software used to post process the LiDAR data you’ve collected.
Please note the following computer requirements are necessary to process LiDAR data:
Intel Core i7, Ryzen 8, or better.
32 GB RAM.
Nvidia GeForce GTX 1050 Ti or better. (4GB of Digital RAM minimum)
Windows OS.
Check out the video below for a walkthrough on the installation of the software.
LiDAR Processing Software Installation
| Widget Connector | ||||||||||
|---|---|---|---|---|---|---|---|---|---|---|
|
Now that you have your software installed, next you will need to actually process the data. For a full walkthrough of the steps necessary to accomplish this, please watch the video listed below:
Post Processing of LiDAR data Walkthrough using PCMaster
| Widget Connector | ||||||||||
|---|---|---|---|---|---|---|---|---|---|---|
|
| Note |
|---|
Please note that Windows 11 should not be used when processing data. Windows 11 can skew the time of the data as well as the data itself. Avoid using this when you process your data. Windows 10 is suggested. |
Operations
Flight Modes:
...
Loiter - Loiter Mode automatically attempts to maintain the current location, heading and altitude. The user will manually control these aspects of flight with the joysticks, but when the sticks are released, the vehicle will slow to a stop and hold position. The drone should ALWAYS be flown in loiter mode if flying manually. This is mapped to the A button on Wispr controllers.
WisprGroundControl automatically sets the flight mode to loiter when booted.
...
Altitude Hold - When Altitude Hold mode is selected, the throttle automatically controls the current altitude. The drone will remain steady at its current altitude using the barometer, but will drift in potentially any direction, as it is not reading from the GPS in this mode. The joysticks on the controller should be used to maintain position to the best of your ability. Altitude hold should ONLY be used in an emergency situation such as a failed GPS, or if the drone is losing stability in flight. This is mapped to the B button on Wispr controllers.
...
Return To Launch (RTL) - The drone will ascend to the designated altitude before orienting itself toward home, and when positioned above the launch location will lower itself to the ground before disarming upon touchdown. This is mapped to the D button on Wispr controllers.
...
Auto Flight Mode - This mode is exactly what it sounds like- automatic. This mode comes into play when conducting missions, and directs the drone to carry out the instructions written in the mission that has been planned. The drone will fully complete the sequence and return to launch unless interrupted.
...
Guided Flight Mode - Guided flight mode is a lesser used mode that is only applicable for a few functions of flight. This mode functions similarly to Auto flight mode, but applies to smaller sequences that might be performed one or more times in a flight, as well as before conducting a mission. This mode is active when performing a LiDAR calibration, a bridge scan, or a go-to sequence.
If my drone is not flying smoothly, what should I do?
Check that the payload, propellers, screws and landing gear are all secure.
Verify that no errors are being triggered in WisprGroundControl.
If the compass (GPS) has bumped into an object, door, etc. or has been damaged in some way, this can also cause the drone to not fly smoothly. In a worst case scenario, a crash could occur.
It may be necessary to recalibrate the GPS if the flight characteristics observed appear quite unstable.
| Info |
|---|
Note: if you are flying on a windy day, you will observe some movements that are a result of the drone trying to counteract the wind it is in the path of. The more you fly, the better you will be able to discern if the flight behavior you’re seeing is abnormal, or a result of the drone holding its position. |
What is RTK and when should I use it?
RTK is a navigation system that offers very precise position accuracy of your drone. The RTK system is always in use on the drone’s GPS, but can be enhanced with a better signal by using a ground station that communicates with satellites and provides real-time location during the flight.
RTK can be used when you are in an area where your GPS is picking up a low amount of satellites or you have no GPS at all.
RTK can be used with mapping and LiDAR, as it will ensure your drone remains steady horizontally and vertically. This is key in getting accurate results and enhanced positional data down to a centimeter resolution while mapping.
RTK is also used with the Camera Controller. The Camera Controller supports writing of GPS/RTK and gimbal angles from your flight controller directly to the EXIF of photos in the camera SD card.
How do I set up my RTK system to work with a Wispr drone?
To connect your RTK system to your drone, you will need to first make sure you have the Portable Wi-Fi hotspot enabled (on the smart controller) which you can find in the Wireless & Networks section.
Turn the option on using the toggle switch in settings. To do this you can swipe down from the top of the screen and select the icon on the far right to activate tethering.
...
Set up your Wi-Fi hotspot with a network name and password then select save. Now you can connect to your tethered Wi-Fi hotspot under your Wi-Fi list.
...
Open the General Settings tab in WisprGroundControl and scroll to the bottom to the NTRIP section.
Enable the NTRIP server by ticking the box and enter your NTRIP information. Once done, reboot the drone and WisprGroundControl.
You are connected to the RTK base if when clicking the satellite icon in the fly bar you see “3D RTK GPS Lock (Fixed)” informing you that you are now connected to your RTK Base.
...
| Panel | ||||||
|---|---|---|---|---|---|---|
| ||||||
For a walkthrough video, visit this link: RTK with WISPRGroundControl Quick Start Video |
How do I connect my Here+ RTK to the Wispr Drone through WisprGroundControl?
Please read this manual for a walkthrough of connecting your Here+ RTK to your Drone through WisprGroundControl - Using Here+ RTK With Wispr Ground Control
How much power is supplied from the front XT60 power output port?
24 Volts. Although it is an unregulated 6S voltage, which is 21-26.1 volts.
How often should I get my Drone tuned up?
Your drone should be tuned every 200 hours of flight time. You can visit this form https://forms.zohopublic.com/support1745/form/AppointmentBookingForm/formperma/G_bYP13RqCLFI2zE9OqpVP6YISfJI-vm__l5T0WaUiE and fill it out to schedule a Drone tune-up.
If one of the cooling fans under the bottom plate stops spinning, is it still ok to fly the drone?
No! If a fan stops working, please put in a ticket here: https://wisprsystems.atlassian.net/servicedesk/customer/portal/3/group/11/create/38 to get the fan replaced. The drone needs all 4 fans to help cool the inside of the drone to prevent overheating. DO NOT fly if you are aware a fan is not working. This could lead to overheating and the drone malfunctioning.
...
What mode should be used to land the drone if not loiter?
Land mode should be used. The land command (the C button on the controller packaged with Wispr drones) should be issued 6-15 ft from the ground. The user should always use the Land command to land the drone, unless it is not an option due to circumstances such as safety or a crash hazard.
If this is the case, the drone may be descended, landed manually using the joysticks, and disarmed by holding the left joystick down and to the left. This is for emergency cases only. If the Land command or Return To Launch (home button) is available, these should always be used as your first options before a manual landing. Manual landing is reserved for emergency situations such as to avoid injury or destruction of property.
Alternatively, the user can always issue an RTL (Return To Launch) command.
Note that in some cases the user may observe the position of the drone’s target landing spot to be suboptimal, and need to reposition for safe landing. We never recommend adjusting the position of the drone when it is in an RTL or Land sequence. If you feel you need to reposition for landing, shift to loiter beforehand, and then shift back to land when you are happy with your positioning.
General FAQs’
Can the volume of the smart controller be muted/unmuted from inside of WisprGroundControl?
Yes. You can mute all audio output if needed by navigating to the General Settings, then scroll down and check the “Mute all audio output” selection box as seen below. To unmute, uncheck the “Mute all audio output” box.
...
I’ve tried to upload a new version of WGC Flight Firmware through Mission Planner and I get the error “Cannot Read Board”. How can this be fixed?
If you try to load the Custom Flight Firmware onto the drone and you have confirmed everything is connected correctly but you still get this error, check the top right of Mission Planner and ensure the COM port is set to Auto. If it is set to anything else you will not be able to load the Custom Flight Firmware, resulting in this error message.
How do I use the Offline Maps feature and what is its purpose?
Offline maps are a good tool to utilize if you are going to be flying at a later time in an area without Wi-Fi access, but still will need to access maps while flying. Without Wi-Fi, you will not be able to download the maps of the area you are flying in unless previously downloaded through offline maps while connected to a Wi-Fi network to save them.
Here is a guide on how to download and use them on your smart controller : Downloading Maps While Offline and Setting Terrain Follow