...
| Anchor | ||||
|---|---|---|---|---|
|
Table of Contents
| Table of Contents |
|---|
| Anchor | ||||
|---|---|---|---|---|
|
| Wispr Ranger Pro 1000 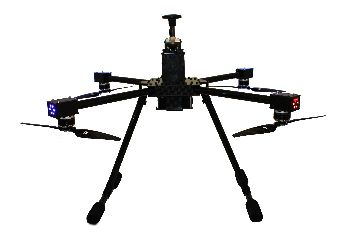 Wispr Ranger Pro 1100 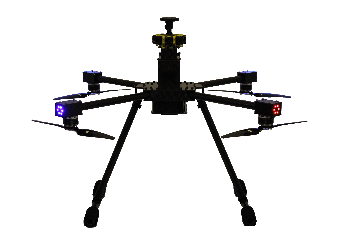 | ||||||
Maximum Payload | 6 lb. | 6 lb. | |||||
Max Flight Time | 33 minutes depending on payload | 33 minutes depending on payload22 minutes with 5-lb | |||||
Max Payload Stability Wind Rating | 45MPH+ Winds 50mph - Tested | 45MPH+ Winds - Tested | |||||
Collision Avoidance | Front Omni-directional collision avoidance | 360⁰ collision avoidance | |||||
RTK Compatible? | Yes | Yes | |||||
PPK Compatible?Yes | Yes | ||||||
Diagonal Wheelbase | 38” without propellers | 38” without propellers38" unfolded | |||||
Max Speed | 50MPH - Tested | 50MPH - Tested | 60MPH | ||||
Max Takeoff weight | 22 lb. | 22 23 lb. | |||||
Height | 15” without landing gear 28” with landing gear | 15” without landing gear 28” with landing gear | |||||
Width | 27.5” | 27.5” | |||||
Weight with battery | 10 17 lb. | 10 lb. | |||||
Max Operating Temperature | 122⁰ F | 122⁰ F | |||||
Minimum Operating Temperature | -4⁰ F | -4⁰ F | |||||
Frame materialCarbon Fiber | Carbon Fiber | ||||||
Battery Requirement | 1 x 6S, 25000mAh, 22.8V LiHV | 1 x 6S, 25000mAh, 22.8V LiHV | |||||
Battery Weight | 5.6 Battery Weight | 5.7 lb. | 5.6 lb. | ||||
Propeller Size | 18.5” x 6.3 folding carbon fiber propellers pair, balanced | 18.5” x 6.3 folding carbon fiber propellers pair, balanced | |||||
24V power port?Yes | Yes | ||||||
HDMI I/O port? | Yes, x2 | Yes, x2 | |||||
Serial I/O port? | Yes, x2 | Yes | |||||
SBUS I/O port?Yes | Yes | ||||||
PWM | Yes, x3 | Yes, x3 | |||||
Altitude accuracy+/- 1” | +/- 1” | ||||||
Orientation LED light colors | Red, Blue | Red, Blue | |||||
Flight Controller | CubePilot | CubePilot | |||||
Flight controller firmware? | Open Sourced (ArduPilot) | Open Sourced (ArduPilot | |||||
Hand controller? | Black or Blue Herelink Smart Controller | ||||||
Flight controller firmware? | WISPR Flight Firmware (Open Source Software) | ||||||
Ground Control Software? | WISPR Ground Control (Open Source Software) | ||||||
Frame Type | Quad Copter | Quad Copter | |||||
Warranty | 1 – year manufacturer defect | 1 – year manufacturer defect | |||||
Made in America? | Yes | ||||||
Included in Purchase | *Smart Controller | ||||||
Shipping Included | Yes | ||||||
Made In America | Yes |
| Anchor | ||||
|---|---|---|---|---|
|
| Anchor | ||||
|---|---|---|---|---|
|
Front LiDAR collision avoidance sensor
Altimeter (Barometers) x2 for Altitude Orientation
Compass (magnetometers) sensor x2 for Pitch, Roll, Yaw Orientation
Accelerometer (magnetometers) sensor x2 for Pitch, Roll, Yaw Orientation
Gyroscope sensor x2 for Pitch and Roll Orientation
GNSS RTK Receiver Position Orientation
Communication Antenna (2.4GHz FHSS)
| Anchor | ||||
|---|---|---|---|---|
|
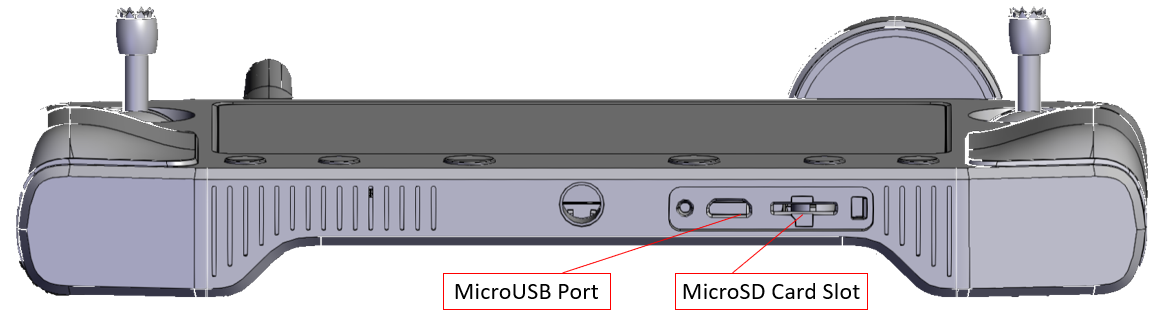
24V Power Output Port (XT60-M)
2 - Micro HDMI Port
SBUS I/O Port (JST 3 Pin)
AUX (SERIAL, SBUS, PWM, Combined) I/O Port (JST 10 Pin)
Universal payload mount (Dove tail mount)
| Anchor | ||||
|---|---|---|---|---|
|
RTK GNSS Receiver
Folding Arm Fold Joint
Landing Gear Detach Joint
24V XT60-M Power Output Port
Communications Antenna
Dual HDMI Input Ports
Front Collision Avoidance LiDAR Sensor
...
| Anchor | ||||
|---|---|---|---|---|
|
SBUS I/O Port
AUXILIARY Port
...
| Anchor | ||||
|---|---|---|---|---|
|
...
| Anchor | ||||
|---|---|---|---|---|
|
Compartment cover for Smart Controller Pairing Button
Drone Cooling System
Dove tail mount for payloads
...
| Anchor | ||||
|---|---|---|---|---|
|
...
| Anchor | ||||
|---|---|---|---|---|
|
Flight controller configuration port
Battery Tray
Battery Input Plugin
5 Volt Out
...
| Anchor | ||||
|---|---|---|---|---|
|
| Anchor | ||||
|---|---|---|---|---|
|
Front LiDAR collision avoidance sensor
Altimeter (Barometers) x2 for Altitude Orientation
Compass (magnetometers) sensor x2 for Pitch, Roll, Yaw Orientation
Accelerometer (magnetometers) sensor x2 for Pitch, Roll, Yaw Orientation
Gyroscope sensor x2 for Pitch and Roll Orientation
GNSS Receiver (RTK compatible GPS) for position Orientation
Communication Antenna (2.4GHz FHSS)
| Anchor | ||||
|---|---|---|---|---|
|
24V Power Port (XT60-M)
2 - Micro HDMI Port
SBUS I/O Port (JST 3 Pin)
AUX (SERIAL, SBUS, PWM, Combined) I/O Port (JST 10 Pin)
Universal payload mount (Dove tail mount)
| Anchor | ||||
|---|---|---|---|---|
|
RTK GNSS Receiver
Folding Arm Fold Joint
Landing Gear Detach Joint
24V XT60-M Power Output Port
Communications Antenna
Dual HDMI Input Ports
Omni-directional Collision Avoidance LiDAR Sensor
...
| Anchor | ||||
|---|---|---|---|---|
|
SBUS I/O Port
AUXILIERY I/O Port
...
| Anchor | ||||
|---|---|---|---|---|
|
...
| Anchor | ||||
|---|---|---|---|---|
|
Compartment cover for Smart Controller Pairing Button
Drone Cooling System
Dove tail mount for payloads
...
| Anchor | ||||
|---|---|---|---|---|
|
...
| Anchor | ||||
|---|---|---|---|---|
|
Flight controller configuration port
Battery Tray
Battery Input Plugin
5 Volt Out
...
| Anchor | ||||
|---|---|---|---|---|
|
1. Case External Overview
Left Handle
Right Handle
Rolling Wheels
Rolling Extension Handle
7 – Secure Snaps
...
2. Inside Carrying Case
...
3. Accessories Overview in Carrying Case
Drone
Landing Gear 1
Landing Gear 2
Battery Charger and Cables
2 – Battery
Smart Controller
Small Gimbal Platform
Large Gimbal Platform
Dual Gimbal Platform
...
4. Charging Batteries
...
| Anchor | ||||
|---|---|---|---|---|
|
| Anchor | ||||
|---|---|---|---|---|
|
...
| Anchor | ||||
|---|---|---|---|---|
|
...
| Anchor | ||||
|---|---|---|---|---|
|
...
| Anchor | ||||
|---|---|---|---|---|
|
| Anchor | ||||
|---|---|---|---|---|
|
| Anchor | ||||
|---|---|---|---|---|
|
...
| Anchor | ||||
|---|---|---|---|---|
|
| Anchor | ||||
|---|---|---|---|---|
|
...
| Anchor | ||||
|---|---|---|---|---|
|
| Anchor | ||||
|---|---|---|---|---|
|
To Manual Arm and Takeoff follow the diagram below. Once the drone is launched in the air, it will hold position until you send commands via the smart controller for it to move position.
...
To Manual Land and Disarm follow the diagram below. If you want to land using auto-land button, bring the UAS down to 5 feet above the ground and click the C button to auto-land.
...
To Increase Altitude, Decrease Altitude, and Rotate follow the diagram below.
...
To Strafe Left, Right, Forward, and Backwards follow the diagram below.
...
| Anchor | ||||
|---|---|---|---|---|
|
To Capture Pictures, Record Videos, and Tilt the gimbal up & down, follow the diagram below.
...
| Anchor | ||||
|---|---|---|---|---|
|
| Anchor | ||||
|---|---|---|---|---|
|
Check that you are not in any controlled or military airspaces – if in controlled airspace you need LAANC approval to fly which can be done via, Aloft smart phone app.
Check that your battery is in good health and not swollen or damaged in anyway including the XT90 female connector
Check that landing gear screw joints are tightly secured
Check that arm is fully extended and bracket is secured tightly
Check that your Battery is fully charged to max capacity prior to flight 26.10V for LiPo-HV
Ensure Propellers are attached securely, and the propellers are in the correct orientation CCW – front left and back right motors, and CW – front right and back left motors
Payload gimbal platform is attached securely, and the dove tail handle is pressed securely against the dove tail rail mount.
Remove lens cap from camera Payloads (if applicable)
Motors- Check that motors are not damaged and that they do not have debris in them.
Ensure GPS is securely attached and pointing in the correct direction to the front of the UAS
Check that Landing Gear screws are tight and that the antennas are secured to each landing gear
Check that the wiring harness is plugged in securely and that there is no damage to any of the wireless on the UAS and the payload.
Check for any loose screws or nuts and re-tighten if needed
Confirm battery is inserted correctly and battery strap is tight
Plug in Battery to UAS and confirm the camera is powered
Power on Smart Controller after the UAS is powered and open up QGroundControl (QGC) and once all of the parameters are loaded check the following
Camera live feed is showing up
Maps of the area you are flying in are downloaded to the smart controller. If maps are not on the Smart Controller, connect the smart controller to a 5.8GHz Wi-Fi internet connection and open QGC to download maps to the smart controller.
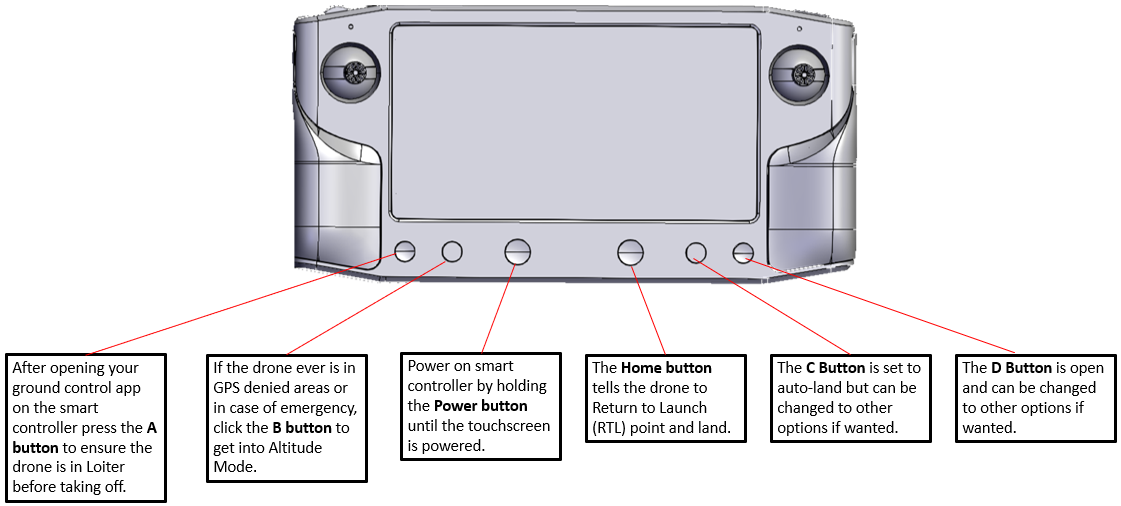
Click A Button and confirm your UAS is in “Loiter” mode not “Stabilize” mode.
| Anchor | ||||
|---|---|---|---|---|
|
Ground Station Smart Controller- fully charged, powered on, connected to QGroundControl (QGC) and loads parameters.
On your Smart Controller check that the battery voltage is around the voltage you believe it to be.
Cooling Fans- Check all 4 electronic speed controller (ESC) fans are on and running properly
Payload- Camera Powers on and you can trigger pictures properly via the smart controller camera trigger button
Groundspeed & Altitude- Both should be at 0 or near 0
GPS- has 3D fix and shows correct position on map (has 14+ satellites and 3D Lock)
Click A and confirm your UAS is in “Loiter” mode
Winds- are within acceptable flying conditions (<= 20-30MPH) for UAS flight and make you’re your UAS is facing into the wind prior to take-off.
Area- The flying area should be checked and made sure it is clear and safe to take off and fly. Ensure no obstructions are above the UAS when taking off.
Crew/civilians- All people, whether part of the flight crew or not, should be at a safe distance from the UAS prior to takeoff
| Anchor | ||||
|---|---|---|---|---|
|
Click A button and ensure you are in loiter mode prior to arming
Arm the UAS using the left joystick on the Smart Controller
Ensure all motors spin simultaneously and if so, you are clear to take off; disarm immediately if they do not.
After takeoff, ensure stability of UAS and check that the gimbal can rotate using gimbal roller and camera control using the camera trigger button via the smart controller
Once you have taken off the screen will start to say Accessing Data, allow the UAS to hover and the geodata to start accessing the EXIF of the pictures. The live camera feed will come back, and the geotagging emblem will be green giving you the good to go to capture data!
Be sure to click the land button (C button) after bringing the UAS down to land to ensure geodata is properly saved to the pictures.
| Anchor | ||||
|---|---|---|---|---|
|
Make sure the UAS facing the wind when coming down to land
Ensure clear and level landing area
Once you have brought the UAS down to 10ft click the land button (C button) on the hand controller to land the UAS.
Always land in land mode when applicable
If the UAS does not disarm automatically you can disarm the UAS via the left joystick.
The screen on the smart controller will let you know the camera is finishing any processing of the geodata, once the live camera feed comes back up it is safe to close QGC and power down your smart controller.
Power down your UAS safely by unplugging the battery from the UAS.
Prior to flying after a landing or after a UAS restart always close and reopen QGC.
...
| Anchor | ||||
|---|---|---|---|---|
|
| Anchor | ||||
|---|---|---|---|---|
|
...
The drone uses 2 pairs of counterclockwise (ccw) and clockwise (cw) propeller propellers. The cw propeller has a L marked on the propeller and the ccw propeller has a R marked on it so you can easily tell the difference in the cw and ccw propellers. Ranger Pro Propellers are 18.5” with a pitch of 6.3.
Attach the cw propellers to the front left and back right motors with the logo on the propeller facing upward towards the sky. Screw in propellers using the 2.5mm driver given with each drone sold. Make sure propellers are mounted tight to the motor and have no play.
Attach the ccw propellers to the front right and back left motors with the KDE logo on the propeller facing upward towards the sky. Screw in propellers using the 2.5mm driver given with each drone sold. Make sure propellers are mounted tight to the motor and have no play.
| Anchor | ||||
|---|---|---|---|---|
|
AFTER 200 HOURS OF ACTUAL FLIGHT CONTACT WISPR SYSTEMS AT SALES@WISPRSYSTEMS.COM FOR BASIC TUNEUP TO REPLACE MOTORS AND RETUNE THE AIRCRAFT.
...
| Anchor | ||||
|---|---|---|---|---|
|
Prior to flying after a landing or after a UAS restart always close and reopen QGC.
After landing restart QGC prior to beginning a new flight.
If camera feed starts up by showing a previous picture, click the Auto focus button (AF) on the onscreen MavCam control and live feed will come up.
When taking off camera will first allow geodata to start accessing EXIF on the picture files prior to the video stream coming up and allowing you to take pictures.
For Sony RX100 VII payloads, you must click the power button on the camera after powering on the UAS for the camera to turn on.
Ensure UAS is in loiter mode before arming and taking off
Alt hold should be used for emergency situations and gps failures only
UAS should be landed before a low battery RTL hit (15% or 21.5V)
Do not take off near large metal structures
Flying low above large metal structures may inhibit GPS
On screen display battery percentage is only valid when fully charged, although a low voltage failsafe is set for backup.
Follow ALL FAA guidelines and regulations
If you get a GPS error that says GPS glitch, no 3D fix while trying to arm. Click the Satellite emblem on the top of the screen and see how many satellites are visible and connected and if you have 3D lock. If you have more than 14 satellites and 3D lock, then you are good attempt arming. Contact customer support if problem persist.
...